Menu

Author

70 posts

Recovering from expired Kubernetes API Server Certificates

Today, it’s been over a year I had not time to focus on my Kubernetes labs, which I am now reminded about as I am no longer able to query their API. API Server certificate expired a few days ago.

Recovering from this is relatively easy. First, connecting to one of your control plane nodes, we would generate new certificates:

cd /etc/kubernetes
cp -rp ssl ssl.old
cd ssl
kubeadm certs renew apiserver
kubeadm crets renew apiserver-kubelet-client
kubeadm certs renew front-proxy-client

Next, we would re-generate the kubernetes-admin kubeconfig file:

kubeadm kubeconfig user --client-name kubernetes-admin \
    --config=/etc/kubernetes/kubeadm-config.yaml \
    --org system:masters >/etc/kubernetes/admin.conf

Then, make sure to share those new certificates and kubeconfig with your other control plane nodes:

scp -rp /etc/kubernetes/admin.conf /etc/kubernetes/ssl \
    root@masterX:/etc/kubernetes/

Make sure to restart kube-apiserver pods:

crictl ps | grep kube-apiserver
crictl stop <container-id>
crictl rm <container-id>
crictl ps | grep kube-apiserver

Once removed, a new kube-apiserver container should be starting up. That one would be using your new certificates: you should be recovering access to cluster API at that stage. Still we’re not done.

Then, we can proceed with kubespray, applying the cluster playbook, which should finish to restart components. You could otherwise reboot all nodes. Or restart kube-controller-managers & scheduler, then kubelet.

I’m a bit surprised that kubespray playbooks were unable to get that rotation working — running the cluster playbook, which usually fixes broken nodes or cluster configuration, was not helpful here. It does not seem to rotate kube-apiserver certificates (I could see tasks checking for their SAN, and then it keeps going, until it fails querying the API).
Still, we can see how simple it is to recover from a bad case of not paying attention to my own monitoring.
As usual, Kubernetes shines by its ease of use and reliability, despite my best effort to crash it!

Tekton Integration Testing & Kubernetes Operators

Today, I tried to implement some integration tests for a Kubernetes controller, in the context of Tekton Pipelines.

Docker-in-Docker

I would run my tests on my own production cluster. I do not want to impact existing operations. As such, I want to run my tests in some isolated environment.

The Tekton Catalog gives a sample building a Docker container image, using a Docker-in-Docker sidecar container, offering with some Docker runtime.

This is typically used on Kubernetes clusters that don’t rely on the Docker container runtime (eg: Cri-O), or whenever we do not want to share the Kubernetes node’s Docker socket file to its containers – which is good security practice.

In our case, we could re-use such a sidecar, executing arbitrary containers, which would help running our tests isolated from the underlying Kubernetes cluster.

Kubernetes-in-Docker

“Kubernetes-in-Docker”, or “KIND”, is part of the Kubernetes SIGs project. It allows to easily deploy a Kubernetes cluster on top of Docker. While you would not use this deploying a production cluster, it’s a perfect solution running some tests.

Cluster topology can be customized. Runtime version can be chosen. Making this ideal running integration tests of Kubernetes controllers

Tekton

All we need is to write some Task, that would integrate Kubernetes-in-Docker, Docker-in-Docker, with the deployment and tests of your controller.

Here is one way to do it:

apiVersion: tekton.dev/v1beta1
kind: Task
metadata:
  name: kind-test-operator
spec:
  params:
  - default: docker.io/curlimages/curl:7.72.0
    description: Image providing curl, pulling binaries required by this Task
    name: init_image
    type: string
  - default: 1.21.1
    description: Kubernetes cluster version
    name: k8s_version
    type: string
  - default: 0.11.1
    description: KIND version
    name: kind_version
    type: string
  - default: docker.io/kindest/node
    description: KinD Node Image repository, including Kubernetes in Docker runtime
    name: kind_node_image
    type: string
  - default: docker.io/library/docker:stable
    description: The location of the docker builder image.
    name: builderimage
    type: string
  - default: docker dind
    description: The location of the docker-in-docker image.
    name: dindimage
    type: string
  steps:

  # first, download kubectl client and kind binary
  # next containers won't have curl
  - args:
    - -c
    - |
        set -x;

        # install kubectl
        curl -o /ci-bin/kubectl -fsL \
              https://dl.k8s.io/release/v$(params.k8s_version)/bin/linux/amd64/kubectl;
        chmod +x /ci-bin/kubectl;

        # install kind
        curl -o /ci-bin/kind -fsL \
            https://github.com/kubernetes-sigs/kind/releases/download/v$(params.kind_version)/kind-linux-amd64;
        chmod +x /ci-bin/kind;

        test -x /ci-bin/kind -a -x /ci-bin/kubectl;
        exit $?;
    command:
    - /bin/sh
    image: $(params.init_image)
    name: setup
    securityContext:
      runAsUser: 1000
    volumeMounts:
    - mountPath: /ci-bin
      name: temp-bin

  # next, using the Docker Builder Image, connecting to the Docker-in-Docker sidecar
  # create a Kubernetes cluster, using kind
  # deploy your operator, using kubectl
  # and proceed with testing your controller
  - args:
    - -c
    - |
        export PATH=/ci-bin:$PATH;

        # start kube cluster
        kind create cluster --image=$(params.kind_node_image):v$(params.k8s_version);

        # test cluster OK
        kubectl get nodes
        if ! kubectl get nodes 2>&1 | grep Ready >/dev/null; then
            echo K8S KO - bailing out;
            exit 1;
        fi;

        # deploy controller / adapt to fit your own usecase
        kubectl create ns opsperator;
        kubectl create -f $(workspaces.source.path)/deploy/kubernetes/crd.yaml;
        kubectl create -f $(workspaces.source.path)/deploy/kubernetes/rbac.yaml;
        kubectl create -f $(workspaces.source.path)/deploy/kubernetes/namespace.yaml;
        grep -vE ' (resources|limits|memory|cpu|nodeSelector|node-role.kubernetes.io/.*):( |$)' \
            $(workspaces.source.path)/deploy/kubernetes/run-ephemeral.yaml | kubectl apply -f-;
        echo Waiting for operator to start ...;
        while true;
        do
            kubectl get pods -n opsperator;
            kubectl get pods -n opsperator | grep 1/1 >/dev/null && break;
            sleep 10;
        done;

        # dummy test for controller
        echo Creating test resource ...;
        kubectl create ns collab-demo;
        sed -e 's|do_network_policy.*|do_network_policy: false|' \
            -e 's|do_exporters.*|do_exporters: false|' \
            $(workspaces.source.path)/deploy/kubernetes/cr/draw.yaml \
            | kubectl apply -f-;
        echo Waiting for draw to start ...;
        while true;
        do
            kubectl get draw -n collab-demo;
            kubectl get draw -n collab-demo -o yaml | grep -A20 'status:' \
                | grep 'ready: true' >/dev/null && break;
            sleep 10;
        done;

        # check assets created by controller
        echo Checking pods:;
        kubectl get pods -n collab-demo -o wide;
        echo Checking ingress:;
        kubectl get ingress,svc -n collab-demo;
        # if needed: include some additional steps, with proper runtime, testing your componets

        echo Done;
        exit 0;
    command:
    - /bin/sh
    env:
    - name: DOCKER_HOST
      value: tcp://localhost:2376
    - name: DOCKER_TLS_VERIFY
      value: '1'
    - name: DOCKER_CERT_PATH
      value: /certs/client
    image: $(params.builderimage)
    name: kind
    securityContext:
      runAsUser: 1000
    volumeMounts:
    - mountPath: /ci-bin
      name: temp-bin
    - mountPath: /certs/client
      name: dind-certs

  # the Docker-in-Docker Sidecar Container
  # where your Kubernetes-in-Docker cluster is being executed
  sidecars:
  - args:
    - --storage-driver=vfs
    - --userland-proxy=false
    env:
    - name: DOCKER_TLS_CERTDIR
      value: /certs
    image: $(params.dindimage)
    name: dind
    readinessProbe:
      periodSeconds: 1
      exec:
        command:
        - ls
        - /certs/client/ca.pem
    securityContext:
      privileged: true
    volumeMounts:
    - mountPath: /certs/client
      name: dind-certs
  volumes:
  - name: temp-bin
    emptyDir: {}
  - name: dind-certs
    emptyDir: {}
  workspaces:
  - name: source

The steps deploying your controller and testing its functioning properly would vary. The example above includes some hardcoded commands for simplicity. Scaling out, you may want to figure out some generic way of proceeding — repositories that would respect some naming convention providing with sample deployment configurations, and unit testing scripts.

Conclusion

This may not be the best way to proceed. If you can afford to run your tests on some actual cluster, without affecting its operations, then this would be easier. You may query the Kubernetes cluster API hosting your Tekton installation, rather than bootstraping Kubernetes in Kubernetes.

Still this was fun to look at. Kubernetes running in Docker-in-Docker. in a Kubernetes. That doesn’t use Docker.

Ceph Crash Recovery

Today we will see the steps to replace a Ceph node, including the MON, MGR, MDS and OSD services.

While I would usually try to salvage the disks from a failing node, sometimes using dd conv=noerror,sync iflag=fullblock dumping a filesystem from a disk ignoring IO errors, others using a disk duplication devices: today I am unable to salvage my node filesystem, we would see the steps to re-deploy a new host from scratch.


Redeploy Hypervisor

Starting from new drives, I reinstalled my physical server, using a local PXE. Using puppet, the server is then configured as a KVM hypervisor, and automount gives me access to my KVM models. I would next deploy a CentOS 8 guest, re-using the FQDN and IP address from my previous Ceph node.


Ceph MON

I would start by installing EPEL and Ceph repositories – matching my Ceph release, Octopus. Update the system, as my CentOS KVM template dates back from 8.1. Reboot. Then, we would install Ceph packages:

dnf install -y ceph-osd python3-ceph-common ceph-mon ceph-mgr ceph-mds ceph-base python3-cephfs

For simplicity, we would disable SELinux and firewalling – matching my other nodes configuration, though this may not be recommended in general. Next, we would retrieve Ceph configuration out of a surviving MON node:

scp -rp mon1:/etc/ceph /etc/

Confirm that we can now query the cluster, and fetch the Ceph mon. keyring:

ceph osd tree
ceph auth get mon. -o /tmp/keyring
ceph mon getmap -o /tmp/monmap

Having those, you may now re-create your MON, re-using its previous ID (in my case, mon3)

mkdir /var/lib/ceph/mon/ceph-mon3
ceph-mon -i mon3 –mkfs –monmap /tmp/monmap –keyring /tmp/keyring
chown -R ceph:ceph /var/lib/ceph/mon/ceph-mon3

Next, re-create the systemd unit starting Ceph MON daemon:

mkdir /etc/systemd/system/ceph-mon.target.wants/
cd /etc/systemd/system/ceph-mon.target.wants/
ln -sf /usr/lib/systemd/system/ceph-mon\@.service ceph-mon\@mon3.service
systemctl daemon-reload
systemctl start ceph-mon@mon3.service
journalctl -u ceph-mon@mon3.service
ceph -s

At that stage, we should be able to see the third monitor re-joined our cluster.


Ceph OSDs

The next step would be to re-deploy our OSDs. Note that, at that stage, we should be able to re-import our existing OSD devices, assuming they were not affected by the outage. Here, I would also proceed with fresh drives (logical volumes on my hypervisor).

Let’s fetch the osd bootstrap key (could be done with ceph auth get, as for the mon. key above) and prepare the directories for my OSDs (IDs 1 and 7)

scp -p mon1:/var/lib/ceph/bootstrap-osd/ceph.keyring /var/lib/ceph/bootstrap-osd/
mkdir -p /var/lib/ceph/osd/ceph-1 /var/lib/ceph/osd/ceph-7
chown -R ceph:ceph /var/lib/ceph/bootstrap-osd /var/lib/ceph/osd

Next, I would re-create my first OSD:

ceph osd out osd.7
ceph osd destroy 7
ceph osd destroy 7 –yes-i-really-mean-it
ceph-volume lvm zap /dev/vdb
ceph-volume lvm prepare –osd-id 7 –data /dev/vdb
ceph-volume lvm activate –all
ceph osd tree
ceph -s

We should be able to confirm the OSD 7 is back up, and that Ceph is now re-balancing data. Let’s finish with the second OSD I need to recover, following the same process:

ceph osd out osd.1
ceph osd destroy 1
ceph osd destroy 1 –yes-i-really-mean-it
ceph-volume lvm zap /dev/vdc
ceph-volume lvm prepare –osd-id 1 –data /dev/vdc
ceph-volume lvm activate –all
ceph osd tree
ceph -s

At that stage, the most critical part is done. Considering I am running on commodity hardware, VMs on old HP Micro Servers with barely 6G RAM and a couple CPUs, I’ve left Ceph alone for something like 12 hours, to avoid wasting resources with MDS and MGR daemons that are not strictly mandatory.


Ceph MGR

My data being pretty much all re-balanced, no more degraded or undersized PGs, I eventually redeployed the MGR service:

mkdir /var/lib/ceph/mgr/ceph-mon3
ceph auth get mgr.mon3 -o /var/lib/ceph/mgr/ceph-mon3/keyring
chown -R ceph:ceph /var/lib/ceph/mgr
mkdir ceph-mgr.target.wants
cd ceph-mgr.target.wants
ln -sf /usr/lib/systemd/system/ceph-mgr\@.service ceph-mgr\@mon3.service
systemctl daemon-reload
systemctl start ceph-mgr@mon3
ceph -s


Ceph MDS

Next, as I’m using CephFS with my Kubernetes clusters, I would need to recreate my third MDS. The process is pretty similar to that of deploying a MGR:

mkdir /var/lib/ceph/mds/ceph-mon3
ceph auth get mds.mon3 -o /var/lib/ceph/mds/ceph-mon3/keyring
chown -R ceph:ceph /var/lib/ceph/mds
mkdir ceph-mds.target.wants
cd ceph-mds.target.wants
ln -sf /usr/lib/systemd/system/ceph-mds\@.service ceph-mds\@mon3.service
systemctl daemon-reload
systemctl start ceph-mds@mon3
ceph -s


Finishing up

In my case, I’ve also installed and configured NRPE probes.
Note that I did not cover the topic of re-deploying RadosGW: in my case, with limited resources on my Ceph nodes, my RGW daemons are deployed as containers, in Kubernetes. My workloads that require s3 storage may then use Kubernetes local Services and Secrets with pre-provisioned radosgw user credentials.

Obviously I could have used ceph-ansible redeploying my node. Though there’s more fun in knowing how it works behind the curtain. I would mostly use ceph-ansible deploying clusters, with customers — mine was last deployed a couple years ago.

The time going from an installed CentOS to a fully recovered Ceph node is pretty amazing. No more than one hour re-creating Ceph daemons, a little over 12h watching objects being recovered and re-balanced — for over 2Tb of data / 5T raw, and again: old and low quality hardware, when compared with what we would deal with IRL.

From its first stable release, in early 2010s, to the product we have today, Ceph is a undeniably a success story in the Open Sources ecosytem. Haven’t seen a corruption I couldn’t easily fix in years, low maintenance cost, still runs fairly well on commodity hardware. And all that despite of RedHat usual fuckery.

Mesos

Today we would take a short break from Kubernetes, and try out another container orchestration solution: Mesos.

Mesos is based on a research project, first presented in 2009 under the name of Nexus. Its version 1 was announced in 2016 by the Apache Software Foundation. In April 2021, a vote concluded Mesos should be moved to the Apache Attic, suggesting it reached end of life, though that vote was later cancelled, due to increased interest.


A Mesos cluster is based on at least three components: a Zookeeper server (or cluster), a set of Mesos Master and the Mesos Slave agent, that would run on all nodes in our cluster. Which could be compared to Kubernetes etcd, control plane and kubelet respectively.

Setting it up, we would install Mesos Repository (on CentOS7: http://repos.mesosphere.io/el/7/noarch/RPMS/mesosphere-el-repo-7-1.noarch.rpm), then install the mesos package on all nodes, as well as mesosphere-zookeeper on the Zookeeper nodes.

Make sure /etc/mesos/zk points to your Zookeeper node(s).

Open ports 2181/tcp on your Zookeeper nodes, port 5050/tcp on master nodes, and 5051/tcp on agents.

Start zookeeper, mesos-master and mesos-slave services.

We should be able to connect our Master console, on port 5050, and confirm our agents have properly registered.Mesos Agents


With Mesos, we are likely to first deploy some frameworks, that would then orchestrate our applications deployment.

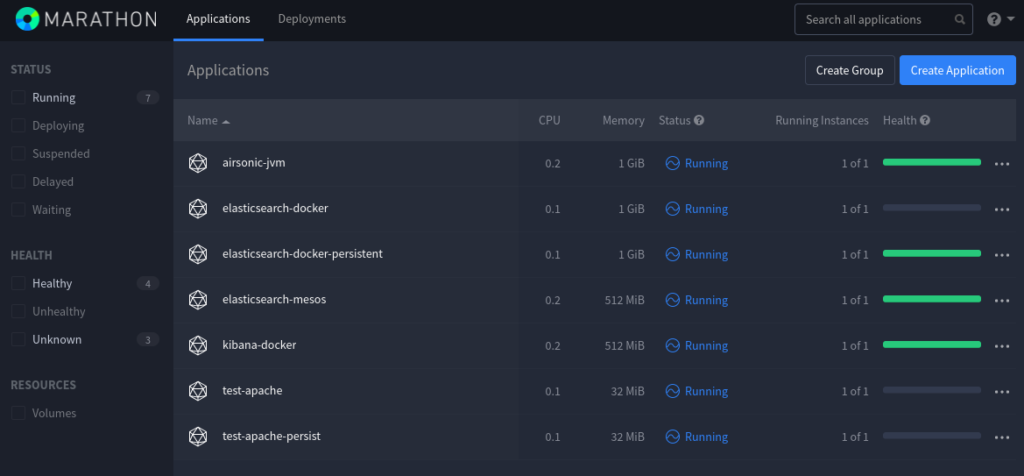
Frameworks would take care of scheduling workloads on your behalf, using Mesos resources. The first one we should look into is Marathon, which could be compared to Kubernetes Deployment and StatefulSets controller, in that it would ensure an application is “always on”.

We may deploy Marathon on a separate node, or to an existing Mesos instance, installing the marathon package from the same repository we installed Mesos from. Note that CentOS7 default JRE seems to be an issue running Marathon latest releases: you may want to install marathon-1.4 instead.

Marathon listens on port 8080/tcp, which should be opened as well. Having done so, we may connect the Marathon UI to deploy our applications – or POST json objects to its API.

Marathon

Now, we could look into what makes Mesos interesting, when compared with Kubernetes.

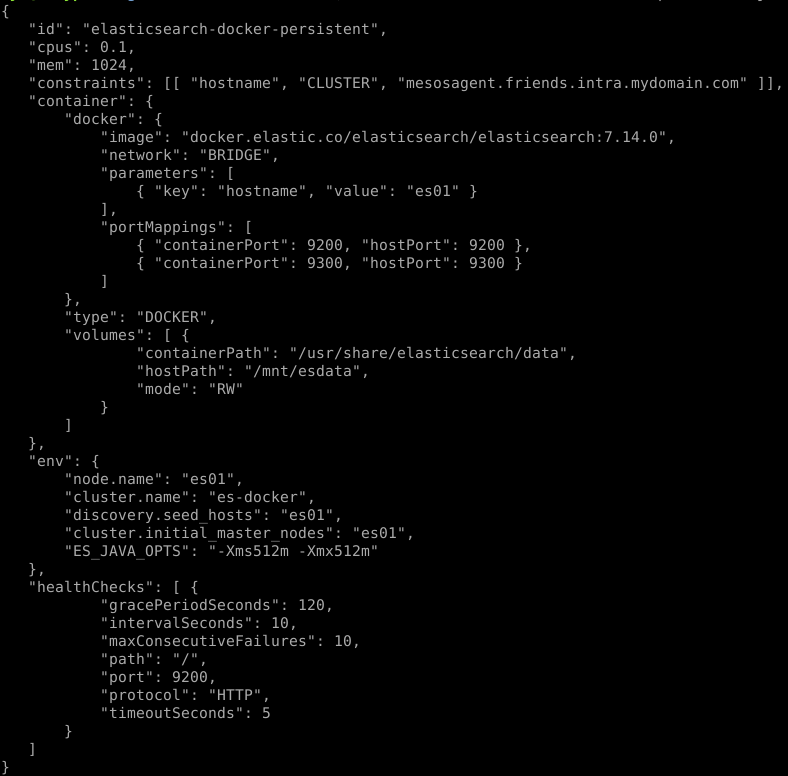
You may know Mesos can be used deploying Docker container, which would be done posting something like the following, to the Marathon API:

Though the above relies on the Docker runtime, which is not mandatory, using Mesos.

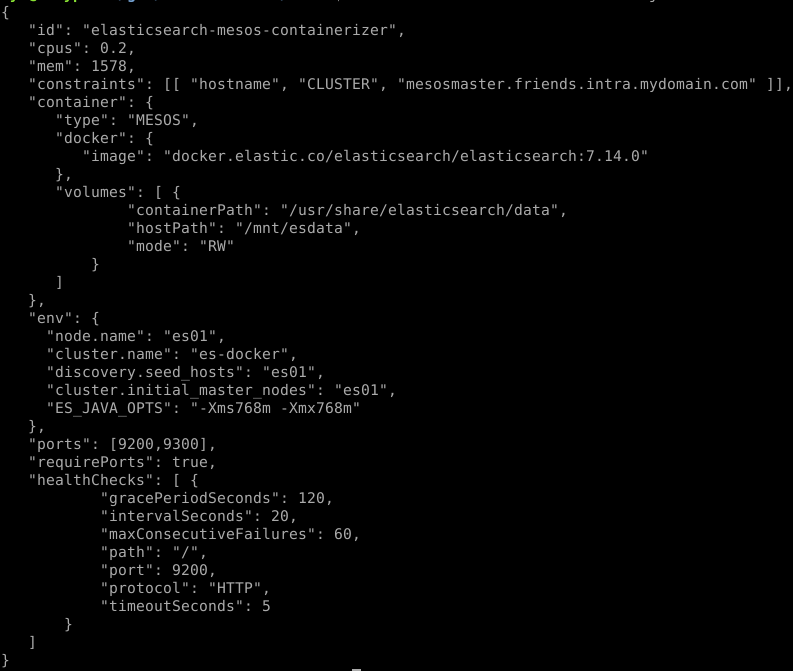
Indeed, we could describe the same deployment, with the following:

Mesos comes with its own containerizer, able to start applications from OCI images.

We could also note that Mesos may be used managing services, based on binary or whatever asset we may pull out of an HTTP repository – or already present, on our nodes filesystem. To demonstrate this, we could start some Airsonic application, posting the following to Marathon:

Going further, we should look into other frameworks, such as Chronos – somewhat comparable to Kubernetes Jobs controller.

PID / IPC / network / filesystem / … isolations may be implemented using isolators. Though a lot of features we would usually find in Kubernetes would here be optional.

Nevertheless, deployments are pretty fast considering the few resources I could allocate that lab. With the vast majority of container orchestration solutions being based on the same projects nowadays, it’s nice to see a contestant with its own original take. Even though Mesos probably suffers from limited interest and contributions, when compared with Kubernetes.

Kubernetes Cluster Upgrade with Kubespray

Last year, I did deploy a Kubernetes cluster using Kubepsray – after giving a try to OpenShift 4.

I did deploy a 1.18.3, which is reaching EOL, and am now looking into upgrading it.
The Kubespray documentation is pretty straight forward: iterate over their releases, one after the other, re-applying the upgrade playbook, and eventually
forcing the Kubernetes version.

$ cd /path/to/kubespray
$ git status
On branch master
[...]
$ git pull
[...]
$ git tag
[...]
v2.13.2
v2.13.3
v2.13.4
v2.14.0
v2.14.1
v2.14.2
v2.15.0
v2.15.1
[...]

My first issue being that I did not use a Kubepsray release to deploy my cluster: I just cloned their repository and went with their last master – worked perfectly fine, which is a testament to the stability of their code.

Looking at existing tags in their repository, I tried to figure out was the closest to the one I’ve been using deploying that cluster. My Kubernetes version 1.18.3 being somewhere in between Kubespray v1.13 and v1.14.0.

$ git diff 6bc60e021e39b049ec7135bd4cfb4adfce44d1f7..v2.13.3
[...]
$ git diff 6bc60e021e39b049ec7135bd4cfb4adfce44d1f7..v2.13.4
[...]
$ git diff 6bc60e021e39b049ec7135bd4cfb4adfce44d1f7..v2.14.0
[...]
$ git diff 6bc60e021e39b049ec7135bd4cfb4adfce44d1f7..v2.14.1
[...]

I decided to start from v1.14.0. Their default Kubernetes version being 1.18.8.

Kubepsray upgrades should be applied one after the other.
According to their doc, one shouldn’t skip any tag – though checking their diffs, it looks like we may skip patch releases.

First, we would check the changes in Kubepsray sample inventory, figuring out which variables needs to be added, removed or changed, from our cluster inventory:

$ git diff 6bc60e021e39b049ec7135bd4cfb4adfce44d1f7..v2.14.0 inventory/sample
[...]
$ vi inventory/mycluster/group_vars/all/all.yaml
$ vi inventory/mycluster/group_vars/k8s-cluster/addons.yaml
$ vi inventory/mycluster/group_vars/k8s-cluster/k8s-cluster.yaml

Chosing the target Kubernetes version, make sure that it is handled by Kubespray.
Check for the kubelet_checksums and crictl_versions arrays in roles/downloads/defaults/main.yaml.
When in doubt, stick with the one configured in their sample inventory.

Once our inventory is ready, we could take some time to make sure our cluster is in an healthy state.
If there’s any deployment that can be shut down, replicas count that can be lowered, … any workload that can be temporarily removed would speed up your upgrade time.
We could also check disk usages, clean it all up, there’s no troubles updating repositories, pulling images, …
In my case, I would also check my Ceph cluster, serving persistent volumes for Kubernetes, ensure that all services are up, that there’s no risk some volume could be stuck at some point, waiting for an I/O or something, …

Eventually, we may start applying our upgrade:

$ ansible-playbook -i ./inventory/mycluster/hosts.yaml ./upgrade-cluster.yml \
    | tee -a upgrade-$(date +%s)-from-1.18.3-to-1.18.8.log

We would see Kubepsray would start checking cluster variables, eventually pre-pulling and caching assets and container images on our nodes.
Once those checks are done, it would start by upgrading the etcd cluster – all at once, though this is done pretty quickly, the Kubernetes API did not seem to suffer from it.

Next, it would upgrade Kubernetes API services on the first master node. Setting it unschedulable if it was not already, draining it, upgrading Kubelet, the container runtime, making sure proper kernel modules are loaded, … Starting the new API, scheduler and controler Pods.
After upgrading the first master, parts of Kubepsray apps are redeployed, installing the last CSI & RBAC configurations. Then, the other masters are upgraded, one after the other.

Once all masters are up-to-date, Kubespray would upgrade the cluster SDN – in my case, Calico.
This goes pretty fast, the playbook applies changes on two nodes at once, I didn’t have much time to check for side effects – all in all, I didn’t see my apps suffer at that stage.

We’re now done with the most critical parts, and left with those that will affect availability for our hosted applications.

Kubespray would then go, one node after the other: cordon, drain, update runtime, restart services, uncordon.
The draining part can take a long time, depending on your nodes sizes and overall usage.

Every 10.0s: kubectl get nodes
NAME       STATUS                     ROLES    AGE    VERSION
compute1   Ready                      worker   314d   v1.18.8
compute2   Ready                      worker   314d   v1.18.8
compute3   Ready                      worker   314d   v1.18.8
compute4   Ready                      worker   314d   v1.18.8
infra1     Ready                      infra    314d   v1.18.9
infra2     Ready                      infra    314d   v1.18.9
infra3     Ready,SchedulingDisabled   infra    314d   v1.18.8
master1    Ready                      master   314d   v1.18.9
master2    Ready                      master   139d   v1.18.9
master3    Ready                      master   314d   v1.18.9

We could see failures – I did have the upgrade playbook crash once, due to one node drain step timing out, which led me to find a PodDisruptionBudget, preventing one Pod from being re-scheduled (KubeVirt). In such case, we may fix the issue, then re-apply the upgrade playbook – which would be a bit faster, though would still go through all steps that already completed.
To avoid these, I then connected on each node during its drain phase, made sure there were no Pod stuck in a Terminating state, or others left Running while the drain operation should be shutting them down.
Also note that re-applying the upgrade playbook, we could speed things up on nodes that were already processed by setting them unschedulable – in which case, the drain is skipped, container runtime and kubelet would still be restarted, with little to no effect on those workloads.

Once all nodes would be up-to-date, Kubespray would go through its Apps once again, applying the last metrics server, ingress controller, registry, depending on which ones you’ve enabled – in my case, I disabled most of those from my inventory prior upgrading, to skip those steps.

In about three hours, I was done with my first upgrade (10x 16G nodes cluster, overloaded). I could start over, from the next tag:

$ git checkout v2.14.1
$ git diff v2.14.0..v2.14.1 inventory/sample
$ vi inventory/mycluster/xxx
$ ansible-playbook -i ./inventory/mycluster/hosts.yaml ./upgrade-cluster.yml \
    | tee -a upgrade-$(date +%s)-from-1.18.8-to-1.18.9.log

This one went faster, a little under 2 hours. No error.
And the next ones:

$ git checkout v2.14.2
$ git diff v2.14.1..v2.14.2 inventory/sample
$ vi inventory/mycluster/xxx
$ ansible-playbook -i ./inventory/mycluster/hosts.yaml ./upgrade-cluster.yml \
    | tee -a upgrade-$(date +%s)-from-1.18.9-to-1.18.10.log
$ git checkout v2.15.0
$ git diff v2.14.2..v2.15.0 inventory/sample
$ vi inventory/mycluster/xxx
$ ansible-playbook -i ./inventory/mycluster/hosts.yaml ./upgrade-cluster.yml \
     | tee -a upgrade-$(date +%s)-from-1.18.10-to-1.19.7.log
$ git checkout v2.15.1
$ git diff v2.15.0..v2.15.1 inventory/sample
$ vi inventory/mycluster/xxx
$ ansible-playbook -i ./inventory/mycluster/hosts.yaml ./upgrade-cluster.yml \
     | tee -a upgrade-$(date +%s)-from-1.19.7-to-1.19.9.log

Having reached the last Kubespray release, we may finish with upgrading and rebooting our nodes. One after the other:

$ kubectl cordon node1
$ kubectl drain --delete-emptydir-data --ignore-daemonsets node1
$ ssh root@node1
# apt-get upgrade
# apt-get dist-upgrade
# reboot
$ kubectl uncordon node1

In my case, having disabled most Kubespray applications, I would also make sure the last Ingress Controller, Registry, RBD & CephFS Provisioner are up to date

$ vi roles/downloads/defaults/main.yaml
$ find roles/kubernetes-apps/ingress_controller/ingress_nginx/ -name '*.j2'
$ vi roles/kubernetes-apps/ingress_controller/ingress_nginx/templates/ds-ingress-nginx-controller.yml.j2
$ kubectl edit -n ingress-nginx ds/ingress-nginx
[...]

In the end, upgrading that cluster from 1.18.3 to 1.19.9 took me about 10 hours. Though I suspect I could have went straight to 1.19.9, and Kubespray v2.15.1. Being my first time with those playbooks, I would rather take my time and repeat until I’m confident enough with it.
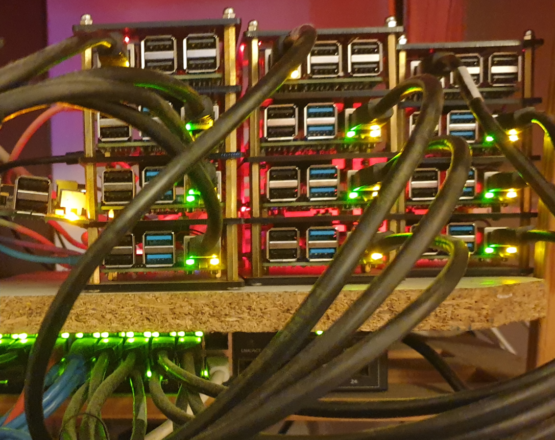
And while it was not on my mind in the first place, I also took a couple hours to upgrade an other cluster of mine, 11 Raspberry Pi nodes I deployed in January, from 1.19.3 to 1.19.9.

Having played with Kubepsray for about a year, I was pretty confident following their docs and releases wouldn’t be an issue. Still, it’s a relief having gone through those upgrades.
Otherwise working with OpenShift 4, it’s kind of amazing to see a Kubernetes cluster upgrading without all the outages you would see with OpenShift: etcd operator and cluster upgrading, the Kubernetes API, the OpenShift API, the SDN, CSI, the OAuth operator, … nodes drain and reboot.
Kubespray upgrades are way smoother, you decide when to upgrade applications and operators. OpenShift 3 and openshift-ansible simplicity, without its unreliability.

Kubernetes & Ceph on Raspberry Pi

Having recently deployed yet-another Kubernetes cluster using Kubespray, experimenting with a Raspberry Pi lab, I’ve been looking with some issue I was last having, with Raspbian.

The issue being that Raspbian does not ship with the rbd kernel module, which is usually necessary attaching rbd devices out of a Ceph cluster.
One way to get around this would obviously be to rebuild the kernel, though I’m usually reluctant to do so.

Digging further, it appears that as an alternative to the rbd kernel module, we may use the nbd one, which does ship with Raspbian.


Here is how we may proceed:


# apt-get install ceph-common rbd-nbd
# scp -p root@mon1:/etc/ceph/ceph.conf /etc/ceph
# scp -p root@mon1:/etc/ceph/ceph.client.admin.keyring /etc/ceph
# rbd -p kube ls
# rbd-nbd map kube/kubernetes-dynamic-pvc-d213345c-c5e8-11ea-ab48-ae4bf5a40627
# mount /dev/nbd0 /mnt
[...]
# mount /mnt
# rbd-nbd unmap /dev/nbd0


Now, that’s a first step. The next one would to to get this working with Kubernetes.
Lately, the CSI (Container Storage Interface) is being promoted up to a point that the Kubernetes scheduler image no longer ships with Ceph binaries: a controller will be dealing devices provisioning, while another one would be attaching and releasing Ceph block devices on behalf of our nodes.

Fortunately, while it is not official yet, all of the container images required can be found, searching on GitHub and DockerHub.
I did publish a copy of the configuration files required setting up Ceph rbd provisioning and devices mapping on Kubernetes. Although it is mandatory for your nodes to run some arm64 versions of the Raspbian image, which is currently in beta, though has been working pretty well as far as I could see.


This is yet another victory for Kubernetes, against products such as OpenShift: Lightweight, modular, portable, easy to deploy, … Efficient.

Redeploy Kubernetes Nodes with KubeSpray

After suffering a disk outage, I had to reinstall a KVM node from scratch, and the Kubernetes master node it was hosting.

The process to deal with such an outage is fairly well documented, in the KubeSpray repository. Though I’ve had a couple complications we will discuss here.


Backups are for loosers. This is a lab I use for R&D, nothing I can’t redeploy. We can start with step two, provisioning new machines to serve as a replacement master, and a second one that would be an ingress node. We would re-use DNS names and IP addresses formerly used by the machines that were lost, to keep things simple.

We would then edit the inventory that was used to bootstrap our cluster. Make sure the faulty master node is the last one listed, in both kube-master and etcd host groups.

Then, the doc would tell you to “Move any broken etcd nodes into the broken_etcd group, make sure the etcd_member_name variable is set“. First remark here: don’t move out nodes of any group. Doc would then tell you to apply a playbook against the etcd and kube-master groups, it would make no sense for those not to include the node we’re recovering. Create the broken_kube-master and broken_etcd host groups, that would only include the name for the node we’re redeploying.

I assumed the etcd_member_name variable needed to be set for the node I was recovering, and though it would be clever to set it in a group_vars/broken_etcd.yaml, to avoid variables in inventories, or creating a host_vars directory. Beware this would break etcd configuration on all nodes. Somehow the broken_etcd variable applies to all members. In such case fixing the /etc/etcd.env configuration file should get you back up.

Once done preparing your inventory, we would proceed with applying the recovery playbook:

ansible-playbook -i inventory/my/hosts.yml -l etcd,kube-master -e etcd_retries=300 recover-control-plane.yml

After a short while, the recovering node was properly added back to the etcd cluster, though it was still unreachable from my other masters. Turns out the ETCD_INITIAL_ADVERTISE_PEER_URLS variable was not set, in the newly installed etcd.env. In system logs (or using netstat), you could see etcd only binding to the loopback interface. Adding the proper URL in there, then restarting etcd was enough, data got replicated pretty quickly.

Playbook crashed a little later. Etcd wasn’t an issue really, it kept running while I was fixing my configuratins, to then fail trying to re-deploy the Ceph RBD provisioner. I don’t want to do these anyway, I went back editing my group_vars, disabling any third-party integration (certmanager, ingress, ceph/cephfs, …).

At that stage, etcd is back up, instead of re-applying the recovery playbook, I went back to the usual cluster.yml, which did the rest:

ansible-playbook -i inventory/my/hosts.yml -l etcd,kube-master cluster.yml

In the end, we can see the node was re-created, though API still lists it as NotReady. Checking logs, calico was failing to start: the file installed in /etc/cni/net.d/10-calico.conflist doesn’t look right. Checking on my other nodes, I could confirm they all have the same copy, which I installed over that provisioned by KubeSpray. Wait a minute, and the node is back up.

Next, as I also lost an ingress node, and to try something new, I would apply the scale.yml playbook. Note this implies the node would not be delete from the API, and we’re expecting its old certificates being re-used:

ansible-playbook -i inventory/my/hosts.yml scale.yml

In the end, we can confirm, on the node we re-deployed, the /etc/ssl/etcd/ssl/ holds a pair of files, dating back from initial node deployment. Also, I’m pleased to see calico properly started up, no need to patch configurations this time.

I was still left with containers in CrashLoopBackOff, unable to contact the Kubernetes API, on the nodes I redeployed. I first tried to restart the corresponding Calico containers, then those still unable to start. Nothing I wouldn’t have seen with OpenShift.


From switching off my faulty KVM host to change its disk, re-install it using PXE, re-deploy it using puppet, then re-deploying Kubernetes nodes, I lost about 3 hours. Nevertheless, this was a good experience.

KubeSpray might not be perfect, though having worked with OpenShift 3, I don’t mind debugging playbooks as they run – and frankly, this went so much better than the usual OpenShift crash recovery.

Deploying Kubernetes with KubeSpray

I should first admit OpenShift 4 is slowly recovering from its architectural do-over. I’m still missing something that would be production ready, and quite disappointed by the waste of resources, violent upgrades, broken CSI, somewhat unstable RH-CoreOS, a complicated deployment scheme when dealing with bare-metal, … among lesser critical bugs.

OpenShift 3 is still an interesting platform hosting production workloads, although its being based on Kubernetes 1.11 makes it quite an old version already.

After some experimentation on a Raspberry-Pi lab, I figured I would give Kubernetes a try on x86. Doing so, I would be looking at KubeSpray.


If you’re familiar with OpenShift 3 cluster deployments, you may have been using openshift-ansible already. Kube-spray is a similar solution, focused on Kubernetes, simplifying the process of bootstrapping, scaling and upgrading highly available clusters.

Currently, kube-spray allows for deploying Kubernetes with container runtimes such as docker, cri-o, containerd, SDN based on flannel, weave, calico, … as well as a registry, some nginx based ingress controller, certs manager controller, integrated metrics, or the localvolumes, rbd and cephfs provisioner plugins.

Comparing with OpenShift 4, the main missing components would be the cluster and developer consoles, RBAC integrating with users and groups from some third-party authentication provider. Arguably, the OLM, though I never really liked that one — makes your operators deployment quite abstract, and complicated to troubleshoot, as it involves several namespaces and containers, … The Prometheus Operator, that could still be deployed manually.
I can confirm everything works perfectly deploying on Debian Buster nodes, with containerd and calico. Keeping pretty much all defaults in place and activating all addons.


The sample variables shipping with kube-spray are pretty much on point. We would create an inventory file, such as the following:

all:
  hosts:
    master1:
      access_ip: 10.42.253.10
      ansible_host: 10.42.253.10
      ip: 10.42.253.10
      node_labels:
        infra.utgb/zone: momos-adm
    master2:
      access_ip: 10.42.253.11
      ansible_host: 10.42.253.11
      ip: 10.42.253.11
      node_labels:
        infra.utgb/zone: thaoatmos-adm
    master3:
      access_ip: 10.42.253.12
      ansible_host: 10.42.253.12
      ip: 10.42.253.12
      node_labels:
        infra.utgb/zone: moros-adm
    infra1:
      access_ip: 10.42.253.13
      ansible_host: 10.42.253.13
      ip: 10.42.253.13
      node_labels:
        node-role.kubernetes.io/infra: “true”
        infra.utgb/zone: momos-adm
    infra2:
      access_ip: 10.42.253.14
      ansible_host: 10.42.253.14
      ip: 10.42.253.14
      node_labels:
        node-role.kubernetes.io/infra: “true”
        infra.utgb/zone: thanatos-adm
    infra3:
      access_ip: 10.42.253.15
      ansible_host: 10.42.253.15
      ip: 10.42.253.15
      node_labels:
        node-role.kubernetes.io/infra: “true”
        infra.utgb/zone: moros-adm
    compute1:
      access_ip: 10.42.253.20
      ansible_host: 10.42.253.20
      ip: 10.42.253.20
      node_labels:
        node-role.kubernetes.io/worker: “true”
        infra.utgb/zone: momos-adm
    compute2:
      access_ip: 10.42.253.21
      ansible_host: 10.42.253.21
      ip: 10.42.253.21
      node_labels:
        node-role.kubernetes.io/worker: “true”
        infra.utgb/zone: moros-adm
    compute3:
      access_ip: 10.42.253.22
      ansible_host: 10.42.253.22
      ip: 10.42.253.22
      node_labels:
        node-role.kubernetes.io/worker: “true”
        infra.utgb/zone: momos-adm
    compute4:
      access_ip: 10.42.253.23
      ansible_host: 10.42.253.23
      ip: 10.42.253.23
      node_labels:
        node-role.kubernetes.io/worker: “true”
        infra.utgb/zone: moros-adm
    children:
      kube-master:
        hosts:
          master1:
          master2:
          master3:
      kube-infra:
        hosts:
          infra1:
          infra2:
          infra3:
      kube-worker:
        hosts:
          compute1:
          compute2:
          compute3:
          compute4:
      kube-node:
        children:
          kube-master:
          kube-infra:
          kube-worker:
      etcd:
        hosts:
          master1:
          master2:
          master3:
      k8s-cluster:
        children:
          kube-master:
          kube-node:
      calico-rr:
        hosts: {}

Then, we’ll edit the sample group_vars/etcd.yml:

etcd_compaction_retention: “8”
etcd_metrics: basic
etcd_memory_limit: 5GB
etcd_quota_backend_bytes: 2147483648
# ^ WARNING: sample var tells about “2G”
# which results in etcd not starting (deployment_type=host)
# journalctl shows errors such as:
# > invalid value “2G” for ETCD_QUOTA_BACKEND_BYTES: strconv.ParseInt: parsing “2G”: invalid syntax
# Also note: here, I’m setting 20G, not 2.
etcd_deployment_type: host

Next, common variables in group_vars/all/all.yml:

etcd_data_dir: /var/lib/etcd
bin_dir: /usr/local/bin
kubelet_load_modules: true
upstream_dns_servers:
– 10.255.255.255
searchdomains:
– intra.unetresgrossebite.com
– unetresgrossebite.com
additional_no_proxy: “*.intra.unetresgrossebite.com,10.42.0.0/15”
http_proxy: “http://netserv.vms.intra.unetresgrossebite.com:3128/”
https_proxy: “{{ http_proxy }}”
download_validate_certs: False
cert_management: script
download_container: true
deploy_container_engine: true
apiserver_loadbalancer_domain_name: api-k8s.intra.unetresgrossebite.com
loadbalancer_apiserver:
  address: 10.42.253.152
  port: 6443
loadbalancer_apiserver_localhost: false
loadbalancer_apiserver_port: 6443

We would also want to customize the variables in group_vars/k8s-cluster/k8s-cluster.yml:

kube_config_dir: /etc/kubernetes
kube_script_dir: “{{ bin_dir }}/kubernetes-scripts”
kube_manifest_dir: “{{ kube_config_dir }}/manifests”
kube_cert_dir: “{{ kube_config_dir }}/ssl”
kube_token_dir: “{{ kube_config_dir }}/tokens”
kube_users_dir: “{{ kube_config_dir }}/users”
kube_api_anonymous_auth: true
kube_version: v1.18.3
kube_image_repo: “k8s.gcr.io”
local_release_dir: “/tmp/releases”
retry_stagger: 5
kube_cert_group: kube-cert
kube_log_level: 2
credentials_dir: “{{ inventory_dir }}/credentials”
kube_api_pwd: “{{ lookup(‘password’, credentials_dir + ‘/kube_user.creds length=15 chars=ascii_letters,digits’) }}”
kube_users:
  kube:
    pass: “{{ kube_api_pwd }}”
    role: admin
    groups:
    – system:masters
kube_oidc_auth: false
kube_basic_auth: true
kube_token_auth: true
kube_network_plugin: calico
kube_network_plugin_multus: false
kube_service_addresses: 10.233.0.0/18
kube_pods_subnet: 10.233.64.0/18
kube_network_node_prefix: 24
kube_apiserver_ip: “{{ kube_service_addresses|ipaddr(‘net’)|ipaddr(1)|ipaddr(‘address’) }}”
kube_apiserver_port: 6443
kube_apiserver_insecure_port: 0
kube_proxy_mode: ipvs
# using metallb, set to true
kube_proxy_strict_arp: false
kube_proxy_nodeport_addresses: []
kube_encrypt_secret_data: false
cluster_name: cluster.local
ndots: 2
kubeconfig_localhost: true
kubectl_localhost: true
dns_mode: coredns
enable_nodelocaldns: true
nodelocaldns_ip: 169.254.25.10
nodelocaldns_health_port: 9254
enable_coredns_k8s_external: false
coredns_k8s_external_zone: k8s_external.local
enable_coredns_k8s_endpoint_pod_names: false
system_reserved: true
system_memory_reserved: 512M
system_cpu_reserved: 500m
system_master_memory_reserved: 256M
system_master_cpu_reserved: 250m
deploy_netchecker: false
skydns_server: “{{ kube_service_addresses|ipaddr(‘net’)|ipaddr(3)|ipaddr(‘address’) }}”
skydns_server_secondary: “{{ kube_service_addresses|ipaddr(‘net’)|ipaddr(4)|ipaddr(‘address’) }}”
dns_domain: “{{ cluster_name }}”
kubelet_deployment_type: host
helm_deployment_type: host
kubeadm_control_plane: false
kubeadm_certificate_key: “{{ lookup(‘password’, credentials_dir + ‘/kubeadm_certificate_key.creds length=64 chars=hexdigits’) | lower }}”
k8s_image_pull_policy: IfNotPresent
kubernetes_audit: false
dynamic_kubelet_configuration: false
default_kubelet_config_dir: “{{ kube_config_dir }}/dynamic_kubelet_dir”
dynamic_kubelet_configuration_dir: “{{ kubelet_config_dir | default(default_kubelet_config_dir) }}”
authorization_modes:
– Node
– RBAC
podsecuritypolicy_enabled: true
container_manager: containerd
resolvconf_mode: none
etcd_deployment_type: host

Finally, we may enable additional components in group_vars/k8s-cluster/addons.yml:

dashboard_enabled: true
helm_enabled: false

registry_enabled: false
registry_namespace: kube-system
registry_storage_class: rwx-storage
registry_disk_size: 500Gi

metrics_server_enabled: true
metrics_server_kubelet_insecure_tls: true
metrics_server_metric_resolution: 60s
metrics_server_kubelet_preferred_address_types: InternalIP

cephfs_provisioner_enabled: true
cephfs_provisioner_namespace: cephfs-provisioner
cephfs_provisioner_cluster: ceph
cephfs_provisioner_monitors: “10.42.253.110:6789,10.42.253.111:6789,10.42.253.112:6789”
cephfs_provisioner_admin_id: admin
cephfs_provisioner_secret: key returned by ‘ceph auth get client.admin’
cephfs_provisioner_storage_class: rwx-storage
cephfs_provisioner_reclaim_policy: Delete
cephfs_provisioner_claim_root: /volumes
cephfs_provisioner_deterministic_names: true

rbd_provisioner_enabled: true
rbd_provisioner_namespace: rbd-provisioner
rbd_provisioner_replicas: 2
rbd_provisioner_monitors: “10.42.253.110:6789,10.42.253.111:6789,10.42.253.112:6789”
rbd_provisioner_pool: kube
rbd_provisioner_admin_id: admin
rbd_provisioner_secret_name: ceph-secret-admin
rbd_provisioner_secret: key retured by ‘ceph auth get client.admin’
rbd_provisioner_user_id: kube
rbd_provisioner_user_secret_name: ceph-secret-user
rbd_provisioner_user_secret: key returned by ‘ceph auth gt client.kube’
rbd_provisioner_user_secret_namespace: “{{ rbd_provisioner_namespace }}”
rbd_provisioner_fs_type: ext4
rbd_provisioner_image_format: “2”
rbd_provisioner_image_features: layering
rbd_provisioner_storage_class: rwo-storage
rbd_provisioner_reclaim_policy: Delete

ingress_nginx_enabled: true
ingress_nginx_host_network: true
ingress_publish_status_address: “”
ingress_nginx_nodeselector:
  node-role.kubernetes.io/infra: “true”
ingress_nginx_namespace: ingress-nginx
ingress_nginx_insecure_port: 80
ingress_nginx_secure_port: 443
ingress_nginx_configmap:
  map-hash-bucket-size: “512”

cert_manager_enabled: true
cert_manager_namespace: cert-manager

We now have pretty much everything ready. Last, we would deploy some haproxy node, proxying requests to Kubernetes API. To do so, I would use a pair of VMs, with keepalived and haproxy. On both, install necessary packages and configuration:

apt-get update ; apt-get install keepalived haproxy hatop
cat << EOF>/etc/keepalived/keepalived.conf
global_defs {
  notification_email {
    contact@example.com
  }
 notification_email_from keepalive@$(hostname -f)
  smtp_server smtp.example.com
  smtp_connect_timeout 30
}

vrrp_instance VI_1 {
  state MASTER
  interface ens3
  virtual_router_id 101
  priority 10
  advert_int 101
  authentication {
    auth_type PASS
    auth_pass your_secret
  }
  virtual_ipaddress {
  10.42.253.152
  }
}
EOF
echo net.ipv4.conf.all.forwarding=1 >>/etc/sysctl.conf
sysctl -w net.ipv4.conf.all.forwarding=1
systemctl restart keepalived && systemctl enable keepalived
#hint: use distinct priorities on nodes
cat << EOF>/etc/haproxy/haproxy.cfg
global
  log /dev/log local0
  log /dev/log local1 notice
  chroot /var/lib/haproxy
  stats socket /run/haproxy/admin.sock mode 660 level admin expose-fd listeners
  stats timeout 30s
  user haproxy
  group haproxy
  daemon
  ca-base /etc/ssl/certs
  crt-base /etc/ssl/private
  ssl-default-bind-ciphers ECDH+AESGCM:DH+AESGCM:ECDH+AES256:DH+AES256:ECDH+AES128:DH+AES:RSA+AESGCM:RSA+AES:!aNULL:!MD5:!DSS
  ssl-default-bind-options no-sslv3

defaults
  log global
  option dontlognull
  timeout connect 5000
  timeout client 50000
  timeout server 50000
  errorfile 400 /etc/haproxy/errors/400.http
  errorfile 403 /etc/haproxy/errors/403.http
  errorfile 408 /etc/haproxy/errors/408.http
  errorfile 500 /etc/haproxy/errors/500.http
  errorfile 502 /etc/haproxy/errors/502.http
  errorfile 503 /etc/haproxy/errors/503.http
  errorfile 504 /etc/haproxy/errors/504.http

listen kubernetes-apiserver-https
  bind 0.0.0.0:6443
  mode tcp
  option log-health-checks
  server master1 10.42.253.10:6443 check check-ssl verify none inter 10s
  server master2 10.42.253.11:6443 check check-ssl verify none inter 10s
  server master3 10.42.253.12:6443 check check-ssl verify none inter 10s
  balance roundrobin
EOF
systemctl restart haproxy && systemctl enable haproxy
cat << EOF>/etc/profile.d/hatop.sh
alias hatop=’hatop -s /run/haproxy/admin.sock’
EOF

We may now deploy our cluster:

ansible -i path/to/inventory cluster.yml

For a 10 nodes cluster, it shouldn’t take more than an hour.
It is quite nice, to see you can have some reliable Kubernetes deployment, with less than 60 infra Pods.

I’m also noticing that while the CSI provisioner is being used, creating Ceph RBD and CephFS volumes: the host is still in charge of mounting our those volumes – which is, in a way, a workaround to the CSI attacher plugins.
Although, on that note, I’ve heard those issues with blocked volumes during nodes failures was in its way to being solved, involving a fix to the CSI spec.
Sooner or later, we should be able to use the full CSI stack.

All in all, kube-spray is quite a satisfying solution.
Having struggled quite a lot with openshift-ansible, and not quite yet satisfied with their lasts installer, kube-spray definitely feels like some reliable piece of software, code is well organized, it goes straight to the point, …
Besides, I need a break from CentOS. I’m amazed I did not try it earlier.

Migrating OpenShift 3 Container Runtime

While reaching its end of life, OpenShift 3 remains widely used, and in some cases still more reliable than its successor, OpenShift 4.

OpenShift was historically built on top of Docker, and introduced support for Cri-O, an alternative container runtime. Cri-o integration into OpenShift reached GA with its release 3.9, mid 2018 — based on Kubernetes 1.9 & Cri-o 1.9. Although it has not been without a few hiccups.

As of today, there are still a few bugs involving RPC overflows, when lots of containers are running on a Cri-O nodes, that could result in some operations, addressing all containers, to fail – eg: drains. Or some SDN corruptions, that I suspect to be directly related with Cri-O. Pending RFE to implement SELinux audit logging, similar to what already exists for Docker, … And the fact OpenShift 4 drops Docker support, while ideologically commendable, is quite a bold move right now, considering the youth of Cri-O.


Lately, a customer of mine contacted me regarding a cluster, as I did help them to deploy it. Mid 2019, an architect recommended the with OpenShift 3.11, Cri-O, and GlusterFS CNS storage – aka OCS, OpenShift Container Storage. We did set it up, cluster has been running for almost a year now, when customer opened a case with their support, complaining about an issue with GlusterFS containers behaving unexpectedly.

After a few weeks of troubleshooting, support got back to customer, arguing their setup was not supported, pointing us to a KB item none of us was aware of so far: while OpenShift 3.11 is fully supported with both Cri-O and GlusterFS CNS storage, their combination is not: only Docker, may be used with GlusterFS.

When realizing this, we had to come up with a plan, migrating container runtime from Cri-O to Docker, on any OpenShift node hosting GlusterFS, so support would keep investigating the original issue. Lacking any documentation covering such a migration, I’ve been deploying a lab, reproducing my customer’s cluster.


We will simplify it to an 11 nodes cluster: 3 masters, 3 gluster, 3 ingress, 2 computes. The GlusterFS nodes would also be hosting Prometheus and Hawkular. The Ingress nodes would host the Docker registry and OpenShift routers. We would also deploy a Git server and a few dummy Pods on the compute nodes, hosting some sources and generating activity on GlusterFS backed persistent volumes.

Having reproduced customer’s setup as close as I could, I would then repeat the following process, re-deploying all my GlusterFS nodes. First, let’s pick a node and drain it:

$ oc adm cordon gluster1.demo
$ oc adm drain gluster1.demo --ignore-daemonsets --delete-local-data

Next, we will connect that node, stop OpenShift services, container runtime, dnsmasq, purge some packages, … It will not clean up everything, though would be good enough for us:

# systemctl stop atomic-openshift-node
# systemctl stop crio
# systemctl stop docker
# systemctl disable atomic-openshift-node
# systemctl disable crio
# systemctl disable docker
# grep BOOTSTRAP_CONFIG /etc/sysconfig/atomic-openshift-node
BOOTSTRAP_CONFIG_NAME=node-cm-name
# cp -f /etc/origin/node/resolv.conf /etc/
# systemctl stop dnsmasq
# systemctl disable dnsmasq
# yum -y remove criu docker atomic-openshift-excluder atomic-openshift-docker-excluder cri-tools \
    atomic-openshift-hyperkube atomic-openshift-node docker-client cri-o atomic-openshift-clients \
    dnsmasq
# rm -fr /etc/origin /etc/dnsmasq.d/* /etc/sysconfig/atomic-openshift-node.rpmsave
# reboot

Once node would have rebooted, we may connect back, confirm DNS resolution still works, that container runtimes are gone, … Then we will delete the node from the API:

$ oc delete node gluster1.demo

Next, we would edit our Ansible inventory, reconfiguring that node to only use Docker. In the inventory file, we would add to that node variables some openshift_use_crio=False, overriding some default defined in our group_vars/OSEv3.yaml.

We would also change the openshift_node_group_name variable, to remove the Cri-o specifics from that node kubelet configuration. Note, in some cases, this could involved editing some custom openshift_node_groups definition. For most common deployments, we may only switch the node group name from a crio variant to its docker equivalent (eg: from node-config-infra-crio to node-config-infra).

Finally, still editing Ansible inventory, we would move our migrating node definition, out of the nodes group, and into the new_nodes one — doing so, if you never had to scale that cluster before, be careful that group should inherit your custom OSEv3 settings, maybe set it as children of the OSEv3 host group, though make sure it’s not a member of the node one. At that stage, it is also recommended to have fixed both OpenShift and GlusterFS versions, up to their patch number — in our case, we’re using OCP 3.11.161, OCS 3.11.4.

Make the the node groups configuration is up to date:

$ oc delete -n openshift-node custom-node-group-gfs1 #not necessary if using default node groups
$ ansible-playbook -i inventory /usr/share/ansible/openshift-ansible/playbooks/openshift-master/openshift_node_group.yml

Then, we may proceed as if adding a new node to our cluster:

$ ansible-playbook -i inventory /usr/share/ansible/openshift-ansible/playbooks/openshift-node/scaleup.yml

As soon as the node would have joined back our cluster, the GlusterFS container we were missing should start, using the exact same local volumes and configuration, only now it uses Docker.

Once that GlusterFS Pod is marked back healthy, rsh into any GlusterFS container and query for your volumes health:

$ oc rsh -n glusterfs-namespace ds/glusterfs-clustername
sh-4.2# gluster volume list | while read vol; do
gluster volume heal $vol info;
done

Internal healing mechanisms may not fix all issues, be sure your cluster is healthy before migrating another node. Meanwhile, we would edit back Ansible inventory and make sure to move our node, out of the new_nodes group and back into its original location.

Repeat with all node you need to migrate. Eventually, the openshift_use_crio definition could be moved into some host group settings, avoiding multiple definitions in nodes variables.

To further confirm we were not leaving the cluster in some inconsistent state, I’ve later upgraded that lab, to OCP 3.11.200 and OCS 3.11.5, with only one outstanding note: the atomic-openshift-excluder package was missing, on the nodes I did migrate. While it is installed during cluster deployment, it appears this is not the case during cluster scale outs. Could be a bug with openshift-ansible roles or playbooks: in doubt, make sure to install that package manually afterwards.


Overall, everything went great. While undocumented, this process is nothing extraordinary.

As of migrating to Docker-backed GlusterFS containers, I did reproduce that issue customer was complaining about. As well as another one, related to GlusterFS arbiter bricks space exhaustion.

Thank science, OCS4 is now based on Rook, and Ceph.

KubeVirt

Today we’ll take a quick look at KubeVirt, A Kubernetes native virtualization solution.

While OpenShift and Kubernetes have been all about containers, as of 2018, we’ve started hearing about some weird idea: shipping virtual machines into containers.

Today, KubeVirt is fairly well integrated into OpenShift, which has its own Operator.

If like me, you’re running OpenShift on KVM guests, you’ll first have to make sure nested virtualization was enabled. With an Intel processor, we would look for the following:

$ cat /sys/module/kvm_intel/parameters/nested
Y

Or using AMD:

$ cat /sys/module/kvm_amd/parameters/nested
Y

Unless the above returns with `Y` or `1`, we need to enable nested
virtualization. First, shut down all guests. Then, reload your KVM module:

# modprobe -r kvm_intel
# modprobe kvm_intel nested=1
# cat /sys/module/kvm_intel/parameters/nested
# cat </etc/modprobe.d/kvm.conf
options kvm_intel nested=1
EOF

With AMD, use instead:

# modprobe -r kvm_amd
# modprobe kvm_amd nested=1
# cat /sys/module/kvm_amd/parameters/nested
# cat </etc/modprobe.d/kvm.conf
options kvm_amd nested=1
EOF

Reboot your guests, and confirm you can now find a `/dev/kvm` device:

$ ssh core@compute1.friends
Red Hat Enterprise Linux CoreOS 42.81.20191113.0
...
$ grep vmx /proc/cpuinfo
flags : xxx
...
$ ls /dev/kvm
/dev/kvm

Confirm OpenShift node-capability-detector did discover those devices:

$ oc describe node compute1.xxx
...
Allocatable:
cpu: 7500m
devices.kubevirt.io/kvm: 110
devices.kubevirt.io/tun: 110
devices.kubevirt.io/vhost-net: 110

Now, from the OperatorHub console, we would install the KubeVirt operator. While writing these lines, there are still some bugs, prefer using some lab cluster doing so.

Next, we’ll migrate a test KVM instance, from a regular hypervisor to OpenShift. Here, the first thing we would want to do is to provision a DataVolume.

DataVolumes are built on top of PersistentVolumeClaims, they’re meant to help dealing with persistent volumes, implementing data provisioning.

There’s two ways to go about this: either we can host our disks using a web server, and then we may use the following DataVolume definition:

apiVersion: cdi.kubevirt.io/v1alpha1
kind: DataVolume
metadata:
  name: bluemind-demo
  namespace: wsweet-demo
spec:
  source:
    http:
      url: https://repository.undomaine.com/modeles/kvm/kvm-kubevirt/bm40.qcow2
  pvc:
    accessModes:
    - ReadWriteOnce
    resources:
      requests:
      storage: 20Gi

Or we could use the virtctl client uploading an image from our system into OpenShift:

$ virtctl image-upload dv bluemind-demo --wait-secs=600 --size=8Gi --insecure --block-volume --image-path=/var/lib/libvirt/images/bm40-template.raw
DataVolume wsweet-demo/bluemind-demo created
Waiting for PVC bluemind-demo upload pod to be ready...
Pod now ready
Uploading data to https://cdi-uploadproxy-openshift-operators.apps.undomaine.com
...

The process of uploading a volume would start some temporary Pod, which would use a pair of PVC: one that would receive the final image, the other serving as a temporary storage while upload is running.

Once our image was uploaded, we would be able to create a VirtualMachine object:

apiVersion: kubevirt.io/v1alpha3
kind: VirtualMachine
metadata:
  name: bluemind-demo
  namespace: wsweet-demo
spec:
  running: false
  template:
    metadata:
      labels:
        name: bluemind-demo
    spec:
      domain:
        devices:
          disks:
          - disk:
            bus: virtio
          name: rootfs
          interfaces:
          - name: default
            masquerade: {}
          resources:
            requests:
              memory: 8Gi
              cpu: "1"
      networks:
      - name: default
        pod: {}
terminationGracePeriodSeconds: 600
      volumes:
      - dataVolume:
          name: bluemind-demo
        name: rootfs

$ oc get vm
...
bluemind-demo 2s false
$ virtctl start bluemind-demo
$ oc describe vm bluemind-demo
...
$ oc get vmi
...
bluemind-demo 3s Scheduling
$ oc get pods
...
virt-launcher-bluemind-demo-8kcxz 0/1 ContainerCreating 0 38s

Once that Pod is running, we should be able to attach our guest VNC console:

$ virtctl vnc bluemind-demo

Finish up configuring your system, you may have to rename your network
interfaces, reset IP addresses, fix DNS resolution integrating with OpenShift. Here, we could use cloud-init, or script our own contextualization, installing OpenShift Service CA, …