Menu

Yearly archives "2018"

5 Articles

OpenShift Egress Traffic Management

Today, I’m investigating yet another OpenShift feature: Egress Routers. We would look at how to ensure a given connection leaves our cluster using a given IP address, integrating OpenShift with existing services that would be protected by some kind of IP filter.


First, let’s explain the default behavior of OpenShift.

Deployments are scheduled on OpenShift hosts, eventually leading to containers being started on those nodes.

Filtering OpenShift compute hosts IPs

Filtering OpenShift compute hosts IPs

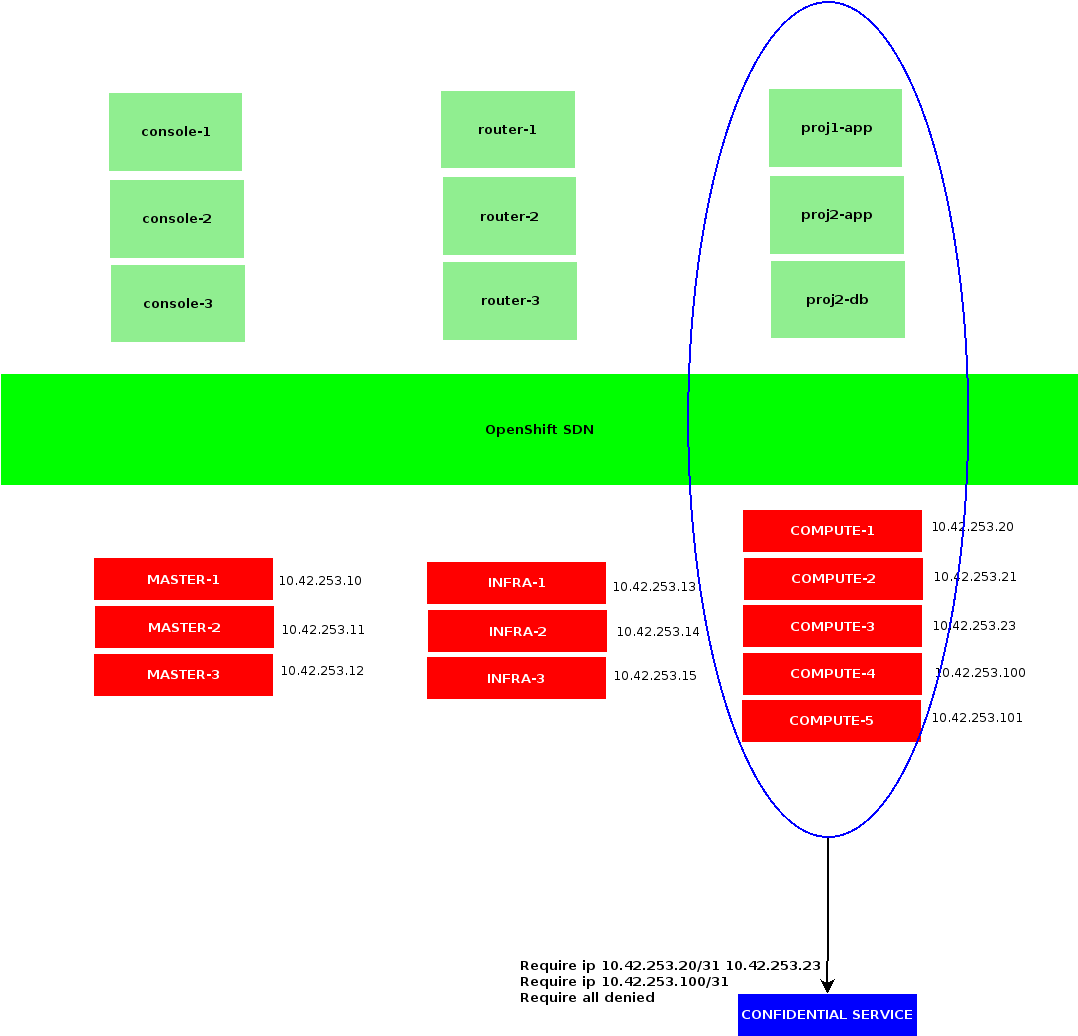
Whenever contacting a service outside OpenShift SDN, a container would exit OpenShift network through the node it’s been started on. Meaning the corresponding connection would get NAT-ed using the node IP our container currently is.

As such, a straight forward way of allowing OpenShift containers to reach a protected service could be to trust all my OpenShift hosts IP addresses connecting to those services.

Note that this sample implies trusting all containers that may be scheduled on those OpenShift nodes, contacting our remote service. It could be acceptable in a few cases, although whenever OpenShift is shared among multiple users or tenants, it usually won’t.

While we could address this by dedicating OpenShift nodes to users requiring access to a same set of protected resources, we would remain limited by the amount of OpenShift nodes composing our cluster.


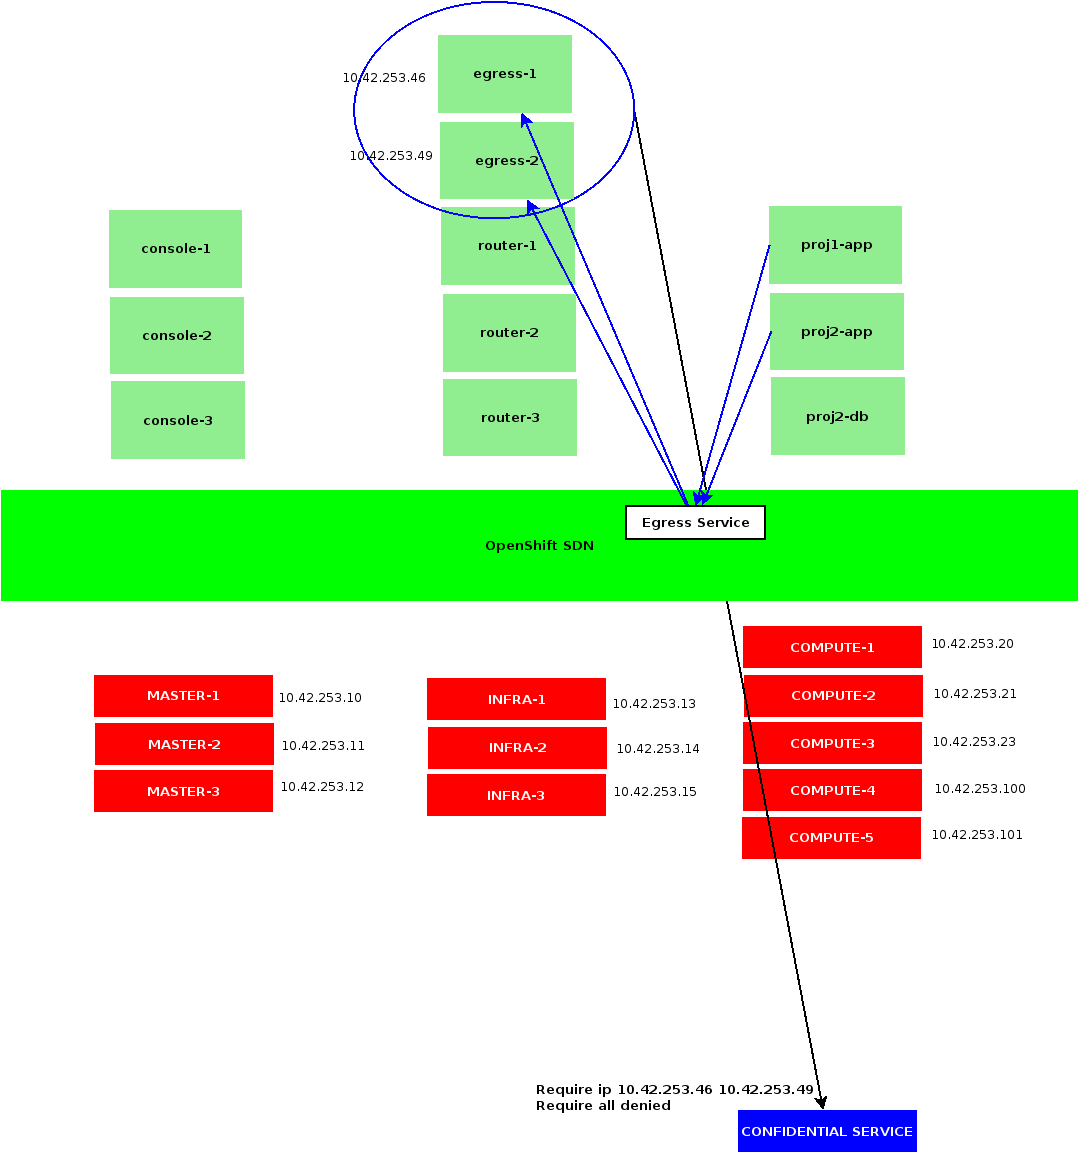
Instead of relying on OpenShift nodes addresses, we could involve additional addresses dedicated to accessing external resources.

A first way to implement this would be to allocate an OpenShift namespace with its own Egress IPs:

$ oc patch netnamespace toto -p ‘{“egressIPs”: [“10.42.253.45″,”10.42.253.54”]}’

Such configuration would also require us to associate these egress IPs to OpenShift nodes’ hostsubnet:

$ oc patch hostsubnet compute3 -p ‘{“egressIPs”: [“10.42.253.45”]}’

$ oc patch hostsubnet compute1 -p ‘{“egressIPs”: [“10.42.253.54”]}’

Then, from a Pod of our toto netnamespace, we could try to reach a remote service:

$ oc rsh -n toto jenkins-1-xyz
sh-4.2$ ping 8.8.8.8
[…]
64 bytes from 8.8.8.8: icmp_seq=90 ttl=119 time=4.01 ms
64 bytes from 8.8.8.8: icmp_seq=91 ttl=119 time=4.52 ms
^C
— 8.8.8.8 ping statistics —
91 packets transmitted, 89 received, 2% packet loss, time 90123ms
rtt min/avg/max/mdev = 3.224/4.350/12.042/1.073 ms

Notice we did lost a few packets. The reason for this is that I rebooted the compute3 host, from which my ping was initially leaving the cluster. While the node was marked NotReady, traffic went through the second node, compute1, holding an egressIP associated to the toto netnamespace. From our gateway, we can confirm the new IP is temporarily being used:

# tcpdump -vvni vlan5 host 10.42.253.54
tcpdump: listening on vlan5, link-type EN10MB
13:11:13.066821 10.42.253.54 > 8.8.8.8: icmp: echo request (id:023e seq:3) [icmp cksum ok] (DF) (ttl 63, id 24619, len 84)
13:11:13.070596 arp who-has 10.42.253.54 tell 10.42.253.5
13:11:13.071194 arp reply 10.42.253.54 is-at 52:54:00:b1:15:b9
13:11:13.071225 8.8.8.8 > 10.42.253.54: icmp: echo reply (id:023e seq:3) [icmp cksum ok] [tos 0x4] (ttl 120, id 14757, len 84)
13:11:14.066796 10.42.253.54 > 8.8.8.8: icmp: echo request (id:023e seq:4) [icmp cksum ok] (DF) (ttl 63, id 25114, len 84)
13:11:14.069990 8.8.8.8 > 10.42.253.54: icmp: echo reply (id:023e seq:4) [icmp cksum ok] [tos 0x4] (ttl 120, id 515, len 84)

As soon as compute3 is done rebooting, tcpdump confirms 10.42.253.54 is no longer used.

Namespace-based IP Filtering

Namespace-based IP Filtering

From the router point of view, we can see that the hardware address for our Egress IPs match those of our OpenShift hosts:

# arp -na | grep 10.42.253
[…]
10.42.253.20 52:54:00:b1:15:b9 vlan5 19m49s
10.42.253.21 52:54:00:6b:99:ad vlan5 19m49s
10.42.253.23 52:54:00:23:1c:4f vlan5 19m54s
10.42.253.45 52:54:00:23:1c:4f vlan5 7m36s
10.42.253.54 52:54:00:b1:15:b9 vlan5 10m35s

As such, this configuration may be preferable whenever the network hosting OpenShift would not allow introducing virtual hardware addresses.

Note that usage for a node’s EgressIP is reserved to the netnamespaces specifically requesting them. Any other container executed on my compute1 and compute3 hosts are still being NAT-ed using 10.42.253.20 and 10.42.253.23 respectively.

Also note that namespace based IP filtering does not rely on any placement rule: containers could get started on any OpenShift node in your cluster, their traffic would still exit OpenShift SDN through a designated node, according to netnamespaces and hostsubnets configurations.

Bearing in mind that whenever the EgressIPs from your netnamespaces are no longer assigned to a node from your cluster – be that due to a missing configuration, or an outage affecting all your Egress hosts – then containers from the corresponding projects would no longer have access to resources out of OpenShift SDN.


Now that we’re familiar with the basics of OpenShift Egress traffic management, we can focus on Egress Routers.

Several Egress Routers implementation exist, we would focus on the couple most commons that are the Redirect mode, and the HTTP proxy mode.

In both cases, we would use a dedicated project hosting a router Pod:

$ oc new-project egress-routers

We would also rely on a ServiceAccount, that may start privileged containers:

$ oc create sa egress-init

As well as a SecurityContextContraint granting our ServiceAccount such privileges:

$ cat <<EOF >egress-scc.yml
kind: SecurityContextConstraints
apiVersion: v1
metadata: { name: egress-init }
allowPrivilegedContainer: true
runAsUser: { type: RunAsAny }
seLinuxContext: { type: RunAsAny }
fsGroup: { type: RunAsAny }
supplementalGroups: { type: RunAsAny }
users: [ “system:serviceaccount:egress-routers:egress-init” ]
EOF
$ oc create -f egress-scc.yml

Running a Redirect Egress Router, we would then create a controller ensuring a Pod would deal with configuring OpenShift SDN NAT-ing the traffic with a specific Egress IP:

$ cat <<EOF >redirect-router.yml
apiVersion: v1
kind: ReplicationController
metadata:
  name: egress-router
spec:
  replicas: 1
  selector:
    name: egress-router
  template:
    metadata:
      name: egress-router
      labels:
        name: egress-router
      annotations:
        pod.network.openshift.io/assign-macvlan: “true”
    spec:
      initContainers:
      – name: egress-demo-init
        image: docker.io/openshift/origin-egress-router
        env:
        – name: EGRESS_SOURCE
          value: 10.42.253.46
        – name: EGRESS_GATEWAY
          value: 10.42.253.1
        – name: EGRESS_DESTINATION
          value: 8.8.8.8
        – name: EGRESS_ROUTER_MODE
          value: init
        securityContext:
          privileged: true
        serviceAccountName: egress-init
      containers:
      – name: egress-demo-wait
        image: docker.io/openshift/origin-pod
      nodeSelector:
        node-role.kubernetes.io/infra: “true”
      serviceAccountName: egress-init
EOF
$ oc create -f redirect-router.yml

Note we are first starting an init container setting up proper iptalbes rules using a few variables. EGRESS_SOURCE is an arbitrary and un-allocated IP address in OpenShift subnet, EGRESS_GATEWAY is our default gateway and EGRESS_DESTINATION the remote address our Egress router would forward its traffic to.

Once our init container is done updating iptables configuration, it is shut down and replaced by our main pod, that would not do anything.

At that point, we could enter that Pod, and see that all its traffic exit OpenShift subnet being NAT-ed with our EGRESS_SOURCE IP, by the OpenShift host executing our container.

From the network gateway point of view, we could notice our EGRESS_SOURCE_IP address is associated to a virtual hardware address:

# arp -na | grep 10.42.253
[…]
10.42.253.46 d6:76:cc:f4:e3:d9 vlan5 19m34s

Contrarily to namespace-scoped Egress IPs, Egress Routers may be scheduled anywhere on OpenShift cluster, according to an arbitrary  – and optional – placement rule. Although it relies on containers, which might take a few seconds to start depending on images being available in Docker local caches. Another drawback being that a single IP can not be shared among several routers, we would not be able to scale them.

To offer with redundancy, we could however setup several Egress Routers per protected service, using distinct EGRESS_SOURCE, and sharing the same EGRESS_DESTINATION.

While we’ve seen our Egress Router container exits our cluster to any remotes using our designated EGRESS_SOURCE address, let’s now look at how to use that router from other OpenShift hosted containers. First, we would create a service identifying our Egress Routers:

$ oc create service –name egress-redirect –namespace egress-routers –port=53 –selector=name=egress-router

Depending on your network plugin we would have to allow traffic coming to that service from third-party Projects. We would then be able to query our EGRESS_DESTINATION through our service:

$ curl http://egress-redirect.egress-routers.svc:53/

From our gateway, we could see the corresponding traffic leaving OpenShift SDN, NAT-ed using our EGRESS_SOURCE:

# tcpdump -vvni vlan5 host 8.8.8.8
tcpdump: listening on vlan5, link-type EN10MB
11:11:53.357775 10.42.253.46.53084 > 8.8.8.8.53: S [tcp sum ok] 1167661839:1167661839(0) win 28200 <mss 1410,sackOK,timestamp 84645569 0,nop,wscale 7> (DF)
11:11:54.357948 10.42.253.46.53084 > 8.8.8.8.53: S [tcp sum ok] 1167661839:1167661839(0) win 28200 <mss 1410,sackOK,timestamp 84646572 0,nop,wscale 7> (DF)
11:11:56.361964 10.42.253.46.53084 > 8.8.8.8.53: S [tcp sum ok] 1167661839:1167661839(0) win 28200 <mss 1410,sackOK,timestamp 84648576 0,nop,wscale 7> (DF)

Redirect Egress Routers

Redirect Egress Routers

Note that the EGRESS_DESTINATION definition may include more than a single address, depending on the protocol and port queried, we could route those connections to distinct remotes:

env:
– name: EGRESS_DESTINATION
  value: |
    80 tcp 203.0.113.25
    8080 tcp 203.0.113.26 80
    8443 tcp 203.0.113.26 443
    203.0.113.27

That snippet would ensure that connections to our router pod on TCP port 80 would be sent to a first remote address, while those to 8080 and 8443 are translated to ports 80 and 443 respectively of a second address, and any other traffic sent to a third remote address.

We could very well set these into a ConfigMap, to eventually include from our Pods configuration, ensuring consistency among a set of routers.

Obviously from OpenShift containers point of view, instead of connecting to our remote service, we would have to reach our Egress Router Service, which would in turn ensure proper forwarding of our requests.


Note that Redirect Egress Routers are limited to TCP and UDP traffic, while usually not recommended dealing with HTTP communications. That later case is best suited for the HTTP Proxy Egress Routers, relying on Squid.

Although very similar to Redirect Egress Routers, the HTTP Proxy would not set an EGRESS_DESTINATION environment variable on its init containers, and would instead pass an EGRESS_HTTP_PROXY_DESTINATION to the main container, such as:

$ cat <<EOF >egress-http.yml
apiVersion: v1
kind: ReplicationController
metadata:
  name: egress-http
spec:
  replicas: 1
  selector:
    name: egress-http
  template:
    metadata:
      name: egress-http
      labels:
        name: egress-http
      annotations:
        pod.network.openshift.io/assign-macvlan: “true”
    spec:
      initContainers:
      – name: egress-demo-init
        image: openshift/origin-egress-router
        env:
        – name: EGRESS_SOURCE
          value: 10.42.253.43
        – name: EGRESS_GATEWAY
          value: 10.42.253.1
        – name: EGRESS_ROUTER_MODE
          value: http-proxy
        securityContext:
          privileged: true
        serviceAccountName: egress-init
      containers:
      – name: egress-demo-proxy
        env:
        – name: EGRESS_HTTP_PROXY_DESTINATION
          value: |
            !perdu.com
            !*.perdu.com
            !10.42.253.0/24
            *
        image: openshift/origin-egress-http-proxy
      nodeSelector:
        node-role.kubernetes.io/infra: “true”
      serviceAccountName: egress-init
EOF
$ oc create -f egress-http.yml

Note the EGRESS_HTTP_PROXY_DESTINATION definition allows us to deny access to specific resources, such as perdu.com and its subdomain or an arbitrary private subnet, while we would allow any other communication with a wildcard.

By default, the Egress HTTP Proxy image listens on TCP port 8080, which allows us to create a service such as the following:

$ oc create service –name egress-http –namespace egress-routers –port=8080 –selector=egress-http

And eventually use that service from other OpenShift containers, based on environment variable proper definition:

$ oc rsh -n too jenkins-1-xyz
sh-4.2$ $ https_proxy=http://egress-http.egress-routers.svc:8080 http_proxy=http://egress-http.egress-routers.svc:8080/ curl -vfsL http://free.fr -o /dev/null
[… 200 OK …]
sh-4.2$ https_proxy=http://egress-http.egress-routers.svc:8080 http_proxy=http://egress-http.egress-routers.svc:8080/ curl -vfsL http://perdu.com -o /dev/null
[… 403 forbidden …]

As for our Redirect Egress Router, running tcpdump on our gateway would confirm traffic is properly NAT-ed:

# tcpdump -vvni vlan5 host 10.42.253.43
[…]
12:11:37.385219 212.27.48.10.443 > 10.42.253.43.55906: . [bad tcp cksum b96! -> 9b9f] 3563:3563(0) ack 446 win 30016 [tos 0x4] (ttl 63, id 1503, len 40)
12:11:37.385332 212.27.48.10.443 > 10.42.253.43.55906: F [bad tcp cksum b96! -> 9ba0] 3562:3562(0) ack 445 win 30016 [tos 0x4] (ttl 63, id 40993, len 40)
12:11:37.385608 10.42.253.43.55908 > 212.27.48.10.443: . [tcp sum ok] 472:472(0) ack 59942 win 64800 (DF) (ttl 64, id 1694, len 40)
12:11:37.385612 10.42.253.43.55906 > 212.27.48.10.443: . [tcp sum ok] 446:446(0) ack 3563 win 40320 (DF) (ttl 64, id 1695, len 40)

While our router ARP table would show records similar to Redirect Egress Router ones:

# arp -na | grep 10.42.253.43
10.42.253.43 d2:87:15:45:1c:28 vlan5 18m52s

Depending on security requirements and the kind of service we want to query, OpenShift is pretty flexible. Although the above configurations do not represent an exhaustive view of existing implementations, we did cover the most basic use cases from OpenShift documentations, which are more likely to remain supported.

Whenever possible, using namespace-scoped IPs seems to be easier, as it would not rely on any other service than OpenShift SDN applying proper routing and NAT-ing. Try to offer with several IPs per namespaces, allowing for quick failover, should a node become unavailable.

If port-based filtering is required, then Redirect Routers are more likely to satisfy, although deploying at least two Pods, using two distinct Egress IPs and node selectors would be recommended, as well as sharing a ConfigMap defining outbound routing.

Similarly, HTTP Proxy Routers would be recommended proxying HTTP traffic, as it would not require anything else than setting a few environment variables and ensuring our runtime does observe environment-based proxy configuration.


Packages Build Pipeline with OpenShift

As an other follow-up to my previous OpenShift posts, today we would look into Jenkins and Nexus integration with OpenShift, while building a dummy package shipping SSH Keys, both as a debien archive and RPM package.

If you’re not concerned with automating Nexus configuration, then you may use sonatype/nexus3 from the Docker hub setting up Nexus Repository Manager on OpenShift.
As I wanted to automate a few configuration tasks, I eventually started working on my own image, forking from a repository offered by Accenture. My copy isn’t yet released publicly, so I’ld just point out it creates a couple users uploading and downloading Artifacts.

Another subject to address would be to prepare a couple images building our Debian and RPM packages. Regarding RPMs, we could divert from Jenkins base slave image:

FROM openshift/jenkins-slave-base-centos7

RUN yum -y install epel-release \
    && yum -y install @development-tools centos-packager rpmdevtools \
    && yum -y install make wget git curl

USER 1001

While for Debian we would want to build some Stretch-based equivalent:

FROM debian:stretch

ENV HOME=/home/jenkins \
    DEBIAN_FRONTEND=noninteractive

USER root

ADD config/* /usr/local/bin/

RUN apt-get -y update \
    && apt-get -y install bc gettext git subversion openjdk-8-jre-headless gnupg curl wget \
                lsof rsync tar unzip debianutils zip bzip2 make gcc g++ devscripts debhelper \
    && apt-get clean \
    && rm -rf /var/lib/apt/lists/* \
    && mkdir -p /home/jenkins \
    && chown -R 1001:0 /home/jenkins \
    && chmod -R g+w /home/jenkins \
    && chmod 664 /etc/passwd \
    && chmod -R 775 /etc/alternatives /usr/lib/jvm \
    && chmod 775 /usr/bin /usr/share/man/man1

USER 1001

ENTRYPOINT [“/usr/local/bin/run-jnlp-client”]

From there, the last item we’ll need, building our packages, is their sources.

Building RPMs, we would write a Spec file such as the following:

Summary: My Package
Name: my-package
Version: 0.0.1
Release: 1%{?dist}
License: MIT
Source: https://repo/sources/el-%{name}-%{version}.tar.gz
URL: https://my.example.com

Autoreq: no
BuildRequires: git
BuildRequires: make

%description
Does something awesome

%global __os_install_post %{nil}
%define debug_package %{nil}
%prep
%autosetup
%build
%install
make install PREFIX=%{buildroot}

%pre
%prerun
%post
%files
%defattr(-,root,root)
%dir %{_datadir}/mydir
%{_datadir}/mydir/myfile

%changelog
 * Thu Aug 30 2018 It’s Me <mario@example.com> 0.0.1-1
 – Initial release – In an other castle?

Now regarding Debian packages, we would need to create a couple subdirectories, configuration files and scripts:

$ mkdir -p debian/source
$ echo “3.0 (quit)” >debian/source/format
$ echo 9 >debian/compat
$ for i in postinst preinst prerm pstrm; do
cat <<EOF >debian/$i
#!/bin/sh
# $i script for my-package

set -e

case “$1” in
  purge|remove|abort-install|disappear) ;;

  upgrade|failed-upgrade|abort-upgrade) ;;

  *)
    echo “postrm called with unknown argument \`$1′” >&2
    exit 1
    ;;
esac

#DEBHELPER#

exit 0
EOF
chmod +x debian/$i
done
$ for i in docs copyright missing-sources README.Debian; do
touch $i
done
$ cat <<EOF >debian/rules
#!/usr/bin/make -f
#DH_VERBOSE = 1

DPKG_EXPORT_BUILDFLAGS = 1
include /usr/share/dpkg/default.mk

# see FEATURE AREAS in dpkg-buildflags(1)
export DEB_BUILD_MAINT_OPTIONS = hardening=+all

# main packaging script based on dh7 syntax
%:
        dh $@

override_dh_auto_install:
        $(MAKE) install PREFIX=$(CURDIR)/debian/my-package

override_dh_auto_build:
        echo nothing to do

override_dh_auto_test:
        echo nothing to do
EOF
$ chmod +x debian/rules
$ cat <<EOF >debian/changelog
my-package (0.0.1-1) unstable; urgency=low

  * Initial release – In an other castle?

— It’s Me <mario@example.com> Thu, 30 Aug 2018 11:30:42 +0200
EOF

From there, we ensure our sources ships with a Makefile, providing with the following rules:

SHARE_DIR = $(PREFIX)/usr/share

createdebsource:
    LANG=C debuild -S -sa

createdebbin:
    LANG=C dpkg-buildpackage -us -uc

createrpm:
    versionNumber=`awk ‘/^Version:/{print $$2;exit;}’ el/my-package.spec`; \
    wdir=”`pwd`/..”; \
    buildroot=”$$wdir/rpmbuild”; \
    for d in SOURCES SPECS BUILD RPMS SRPMS; \
    do \
      mkdir -p “$$buildroot/$$d”; \
    done; \
    cp -p “$$wdir/el-my-package-$$versionNumber.tar.gz” “$$buildroot/SOURCES/”; \
    cp -p “$$wdir/my-package/el/my-package.spec” “$$buildroot/SPECS/”; \
    if ! whoami >/dev/null 2>&1; then \
      chown -R root:root “$$buildroot/SOURCES” “$$buildroot/SPECS”; \
    elif whoami 2>/dev/null | grep default >/dev/null; then \
      chown -R :root “$$buildroot/SOURCES” “$$buildroot/SPECS”; \
    fi; \
    ( \
      cd “$$buildroot”; \
      LANG=C rpmbuild –define “_topdir $$buildroot” -ba SPECS/my-package.spec && \
      find *RPMS -type f | while read output; \
        do \
          mv “$$output” $$wdir/; \
        done; \
    )

createinitialarchive:
    rm -fr .git .gitignore README.md
    versionNumber=`cat debian/changelog | awk ‘/my-package/{print $$2;exit}’ | sed -e ‘s|[()]||g’ -e ‘s|\\(.*\\)-[0-9]*\$$|\\1|’`; \
    ( \
      cd ..; \
      tar -czf my-package_$$versionNumber.orig.tar.gz my-package; \
      mv my-package my-package-$$versionNumber; \
      tar -czf el-my-package-$$versionNumber.tar.gz my-package-$$versionNumber; \
      mv my-package-$$versionNumber my-package; \
    )

install:
    mkdir -p $(SHARE_DIR)/mydir
    install -c -m 0644 myfile $(SHARE_DIR)/mydir/myfile

At which point, we may use the following OpenShift Template, creating a few secrets and a pair of Jenkins Pipelines, building Debian and RPM packages based on our previous images, then uploading their Artifacts to Nexus :

apiVersion: v1
kind: Template
metadata:
  name: my-package-template
objects:
– apiVersion: v1
  kind: Secret
  metadata:
    annotations:
      jenkins.io/credentials-description : ${APPLICATION_NAME} Git Token credential from Kubernetes
    labels:
      jenkins.io/credentials-type: secretText
    name: git-${APPLICATION_NAME}
  stringData:
    text: ${GIT_DEPLOYMENT_TOKEN}
– apiVersion: v1
  kind: Secret
  metadata:
    annotations:
      jenkins.io/credentials-description : ${APPLICATION_NAME} Nexus Credentials from Kubernetes
    labels:
      jenkins.io/credentials-type: usernamePassword
    name: nexus-${APPLICATION_NAME}
  stringData:
  password: ${NEXUS_ARTIFACTS_PASSWORD}
  username: ${NEXUS_ARTIFACTS_USERNAME}
– apiVersion: v1
  kind: BuildConfig
  metadata:
    annotations:
      description: Builds ${APPLICATION_NAME} rpm archive
    name: ${APPLICATION_NAME}-rpm
  spec:
    strategy:
      jenkinsPipelineStrategy:
        jenkinsfile: |-
          try {
            def pkgname = “${APPLICATION_NAME}”
            def label = “${pkgname}-${UUID.randomUUID().toString()}”
            podTemplate(label: label, name: label, cloud: ‘openshift’,
                containers: [ containerTemplate(name: ‘jnlp’, image: ‘${DOCKER_REGISTRY}/${CENTOS_IMAGE}’) ],
                inheritFrom: ‘nodejs’, serviceAccount: ‘jenkins’) {
              timeout(time: 40, unit: ‘MINUTES’) {
                node (label) {
                  stage(“Fetch”) {
                    sh “git config –global http.sslVerify false”
                    sh “mkdir ${pkgname}”
                    withCredentials([string(credentialsId: “git-${pkgname}”, variable: ‘GIT_TOKEN’)]) {
                      sh “echo ‘${SOURCE_REPOSITORY_URL}’ | sed ‘s|^\\(http[s]*://\\)\\(.*\\)|\\1${GIT_TOKEN}@\\2|’ >cloneFrom 2>/dev/null”
                    }
                    def cloneAddress = readFile(‘cloneFrom’).trim()
                    dir (“${pkgname}”) {
                      git([ branch: “master”, changelog: false, poll: false, url: cloneAddress ])
                    }
                  }
                  stage(“Build”) {
                    sh “””
                    ( cd ${pkgname} ; git rev-parse –short HEAD ) >gitHash
                    ( cd ${pkgname} ; make createinitialarchive ; make createrpm )
                    awk ‘/^Release:/{print \$2;exit;}’ ${pkgname}/el/${pkgname}.spec | cut -d% -f1 >patchNumber
                    awk ‘/^Version:/{print \$2;exit;}’ ${pkgname}/el/${pkgname}.spec >versionNumber
                    “””
                  }
                  stage(“Upload”) {
                    def gitHash = readFile(‘gitHash’).trim()
                    def patch = readFile(‘patchNumber’).trim()
                    def version = readFile(‘versionNumber’).trim()
                    sh “echo Uploading artifacts for ${version}-${patch}-${gitHash}”
                    nexusArtifactUploader(
                      nexusVersion: ‘${NEXUS_VERSION}’,
                      protocol: “${NEXUS_PROTO}”,
                      nexusUrl: “${NEXUS_REMOTE}”,
                      groupId: “${NEXUS_GROUP_ID}”,
                      version: “${version}-${patch}-${gitHash}”,
                      repository: “${NEXUS_RPM_REPOSITORY}”,
                      credentialsId: “nexus-${pkgname}”,
                      artifacts: [
                      [ artifactId: “${pkgname}-rpm”,
                      classifier: ”, type: ‘rpm’,
                      file: “${pkgname}-${version}-${patch}.el7.src.rpm” ],
                      [ artifactId: “${pkgname}-rpm”,
                      classifier: ”, type: ‘rpm’,
                      file: “${pkgname}-${version}-${patch}.el7.x86_64.rpm” ],
                      [ artifactId: “${pkgname}-rpm”,
                      classifier: ”, type: ‘tar.gz’,
                      file: “el-${pkgname}-${version}.tar.gz” ]
                      ]
                    )
                  }
                }
              }
            }
          } catch (err) {
            echo “in catch block”
            echo “Caught: ${err}”
            currentBuild.result = ‘FAILURE’
            throw err
          }
      type: JenkinsPipeline
– apiVersion: v1
  kind: BuildConfig
  metadata:
    annotations:
      description: Builds ${APPLICATION_NAME} deb archive
    name: ${APPLICATION_NAME}-deb
  spec:
    strategy:
      jenkinsPipelineStrategy:
        jenkinsfile: |-
          try {
            def pkgname = “${APPLICATION_NAME}”
            def label = “${pkgname}-${UUID.randomUUID().toString()}”
            podTemplate(label: label, name: label, cloud: ‘openshift’,
                containers: [ containerTemplate(name: ‘jnlp’, image: ‘${DOCKER_REGISTRY}/${DEBIAN_IMAGE}’) ],
                inheritFrom: ‘nodejs’, serviceAccount: ‘jenkins’) {
              timeout(time: 40, unit: ‘MINUTES’) {
                node (label) {
                  stage(“Fetch”) {
                    sh “git config –global http.sslVerify false”
                    sh “mkdir ${pkgname}”
                    withCredentials([string(credentialsId: “git-${pkgname}”, variable: ‘GIT_TOKEN’)]) {
                      sh “echo ‘${SOURCE_REPOSITORY_URL}’ | sed ‘s|^\\(http[s]*://\\)\\(.*\\)|\\1${GIT_TOKEN}@\\2|’ >cloneFrom 2>/dev/null”
                    }
                    def cloneAddress = readFile(‘cloneFrom’).trim()
                    dir (“${pkgname}”) {
                      git([ branch: “master”, changelog: false, poll: false, url: cloneAddress ])
                    }
                  }
                  stage(“Build”) {
                    sh “””
                    ( cd ${pkgname} ; git rev-parse –short HEAD ) >gitHash
                    ( cd ${pkgname} ; make createinitialarchive ; make createdebbin )
                    cat ${pkgname}/debian/changelog | awk ‘/${pkgname}/{print \$2;exit}’ | sed -e ‘s|[()]||g’ -e ‘s|.*-\\([0-9]*\\)\$|\\1|’ >patchNumber
                    cat ${pkgname}/debian/changelog | awk ‘/${pkgname}/{print \$2;exit}’ | sed -e ‘s|[()]||g’ -e ‘s|\\(.*\\)-[0-9]*\$|\\1|’ >versionNumber
                    “””
                  }
                  stage(“Upload”) {
                    def gitHash = readFile(‘gitHash’).trim()
                    def patch = readFile(‘patchNumber’).trim()
                    def version = readFile(‘versionNumber’).trim()
                    sh “echo Uploading artifacts for ${version}-${patch}-${gitHash}”
                    nexusArtifactUploader(
                      nexusVersion: ‘${NEXUS_VERSION}’,
                      protocol: “${NEXUS_PROTO}”,
                      nexusUrl: “${NEXUS_REMOTE}”,
                      groupId: “${NEXUS_GROUP_ID}”,
                      version: “${version}-${patch}-${gitHash}”,
                      repository: “${NEXUS_DEB_REPOSITORY}”,
                      credentialsId: “nexus-${pkgname}”,
                      artifacts: [
                      [ artifactId: “${pkgname}-deb”,
                      classifier: ”, type: ‘deb’,
                      file: “${pkgname}_${version}-${patch}_all.deb” ],
                      [ artifactId: “${pkgname}-deb”,
                      classifier: ”, type: ‘txt’,
                      file: “${pkgname}_${version}-${patch}_amd64.buildinfo” ],
                      [ artifactId: “${pkgname}-deb”,
                      classifier: ”, type: ‘txt’,
                      file: “${pkgname}_${version}-${patch}_amd64.changes” ],
                      [ artifactId: “${pkgname}-deb”,
                      classifier: ”, type: ‘tar.xz’,
                      file: “${pkgname}_${version}-${patch}.debian.tar.xz” ],
                      [ artifactId: “${pkgname}-dev”,
                      classifier: ”, type: ‘tar.gz’,
                      file: “${pkgname}_${version}.orig.tar.gz” ],
                      [ artifactId: “${pkgname}-deb”,
                      classifier: ”, type: ‘txt’,
                      file: “${pkgname}_${version}-${patch}.dsc” ]
                      ]
                    )
                  }
                }
              }
            }
          } catch (err) {
            echo “in catch block”
            echo “Caught: ${err}”
            currentBuild.result = ‘FAILURE’
            throw err
          }
      type: JenkinsPipeline
parameters:
– name: APPLICATION_NAME
  description: Package Name – should match that expected by package we’ll build
  displayName: Package Name
  value: my-package
– name: DEBIAN_IMAGE
  description: Jenkins Debian Agent Image – relative to DOCKER_REGISTRY
  displayName: Jenkins Debian Agent Image
  required: true
  value: “cicd/jenkins-agent-debian:latest”
– name: DOCKER_REGISTRY
  description: Docker Registry
  displayName: Docker Registry
  required: true
  value: docker-registry.default.svc:5000
– name: CENTOS_IMAGE
  description: Jenkins Centos Agent Image – relative to DOCKER_REGISTRY
  displayName: Jenkins Centos Agent Image
  required: true
  value: “cicd/jenkins-agent-centos:latest”
– name: GIT_DEPLOYMENT_TOKEN
  description: Git deployment token
  displayName: Git Deployment Token
  required: true
– name: NEXUS_ARTIFACTS_PASSWORD
  description: Nexus Artifacts Upload Password
  displayName: Nexus Artifacts Upload Password
  required: true
  value: admin123
– name: NEXUS_ARTIFACTS_USERNAME
  description: Nexus Artifacts Upload Username
  displayName: Nexus Artifacts Upload Username
  required: true
  value: admin
– name: NEXUS_GROUP_ID
  description: Nexus Group ID
  displayName: Nexus Group ID
  required: true
  value: com.example
– name: NEXUS_DEB_REPOSITORY
  description: Nexus Artifact Debian Repository – remote repository name
  displayName: Nexus Artifact Debian Repository
  required: true
  value: debian
– name: NEXUS_PROTO
  description: Nexus Proto – http or https
  displayName: Nexus Proto
  required: true
  value: http
– name: NEXUS_REMOTE
  description: Nexus Remote URL – proto-less URI connecting to Nexus
  displayName: Nexus Remote URL
  value: “nexus:8081”
  required: true
– name: NEXUS_RPM_REPOSITORY
  description: Nexus Artifact EL Repository – remote repository name
  displayName: Nexus Artifact EL Repository
  required: true
  value: centos
– name: NEXUS_VERSION
  description: Nexus Repository Version
  displayName: Nexus Repository Version
  required: true
  value: nexus3
– name: SOURCE_REPOSITORY_URL
  description: The URL of the repository with your application source code
  displayName: Git Repository URL
  required: true
  value: https://git.example.com/project/my-package

Signing and Scanning Docker Images with OpenShift

You may already know Docker images can be signed. Today we would discuss a way to automate images signature, using OpenShift.

Lately, I stumbled upon a bunch of interesting repositories:

  • https://github.com/redhat-cop/openshift-image-signing-scanning: ansible playbook configuring an OCP cluster, building a base image, setting up a service account and installing a few templates providing with docker images scanning and signing
  • https://github.com/redhat-cop/image-scanning-signing-service: an optional OpenShift third-party service implementing support for ImageSigningRequest and ImageScanningRequest objects
  • https://github.com/redhat-cop/openshift-event-controller: sources building an event controller that would watch for new images pushed to OpenShift docker registry
  • Although these are amazing, I could not deploy them to my OpenShift Origin, due to missing subscriptions and packages.

    image signing environment overview

    image signing environment overview

    In an effort to introduce CentOS support, I forked the first repository from our previous list, and started rewriting what I needed:

    https://github.com/faust64/openshift-image-signing-scanning


    A typical deployment would involve:

  • Generating a GPG keypair on some server (not necessarily related to OpenShift)
  • Depending on your usecase, we could then want to configure docker to prevent unsigned images from being run on our main OpenShift hosts
  • Next, we would setup labels and taints identifying the nodes we trust signing images, as well as apply and install a few templates and a base image
  • At which point, you could either install the event-controller Deployment to watch for all your OpenShift internal registry’s images.

    Or, you could integrate images scanning and signature yourself using the few templates installed, as shown in a sample Jenkinsfile.

    OpenShift Supervision

    Today I am looking back on a few topics I had a hard time properly deploying using OpenShift 3.7 and missing proper dynamic provisioning despite a poorly-configured GlusterFS cluster.
    Since then, I deployed a 3 nodes Ceph cluster, using Sebastien Han’s ceph-ansible playbooks, allowing me to further experiment with persistent volumes.
    And OpenShift Origin 3.9 also came out, shipping with various fixes and new features, such Gluster Block volumes support, that might address some of GlusterFS performances issues.


    OpenShift Ansible playbooks include a set of roles focused on collecting and making sense out of your cluster metrics, starting with Hawkular.

    We could set up a few Pods running Hawkular, Heapster to collect data from your OpenShift nodes and a Cassandra database to store them, defining the following variables and applying the playbooks/openshift-metrics/config.yml playbook:

    Hawkular

    Hawkular integration with OpenShift

    openshift_metrics_cassandra_limit_cpu: 3000m
    openshift_metrics_cassandra_limit_memory: 3Gi
    openshift_metrics_cassandra_node_selector: {“region”:”infra”}
    openshift_metrics_cassandra_pvc_prefix: hawkular-metrics
    openshift_metrics_cassandra_pvc_size: 40G
    openshift_metrics_cassandra_request_cpu: 2000m
    openshift_metrics_cassandra_request_memory: 2Gi
    openshift_metrics_cassandra_storage_type: pv
    openshift_metrics_cassandra_pvc_storage_class_name: ceph-storage
    openshift_metrics_cassanda_pvc_storage_class_name: ceph-storage

    openshift_metrics_image_version: v3.9
    openshift_metrics_install_metrics: True
    openshift_metrics_duration: 14
    openshift_metrics_hawkular_limits_cpu: 3000m
    openshift_metrics_hawkular_limits_memory: 3Gi
    openshift_metrics_hawkular_node_selector: {“region”:”infra”}
    openshift_metrics_hawkular_requests_cpu: 2000m
    openshift_metrics_hawkular_requests_memory: 2Gi
    openshift_metrics_heapster_limits_cpu: 3000m
    openshift_metrics_heapster_limits_memory: 3Gi
    openshift_metrics_heapster_node_selector: {“region”:”infra”}
    openshift_metrics_heapster_requests_cpu: 2000m
    openshift_metrics_heapster_requests_memory: 2Gi

    Note that we are defining both openshift_metrics_cassandra_pvc_storage_class_name and openshit_metrics_cassanda_pvc_storage_class_name due to a typo that was recently fixed, yet not in OpenShift Origin last packages.

    Setting up those metrics may allow you to create Nagios commands based on querying for resources allocations and consumptions, using:

    $ oc adm top node –heapster-namespacce=openshift-infra –heapster-scheme=https node.example.com


    Another solution that integrates well with OpenShift is Prometheus, that could be deployed using the playbooks/openshift-prometheus/config.yml playbook and those Ansible variables:

    Prometheus

    Prometheus showing OpenShift Pods CPU usages

    openshift_prometheus_alertbuffer_pvc_size: 20Gi
    openshift_prometheus_alertbuffer_storage_class: ceph-storage
    openshift_prometheus_alertbuffer_storage_type: pvc
    openshift_prometheus_alertmanager_pvc_size: 20Gi
    openshift_prometheus_alertmanager_storage_class: ceph-storage
    openshift_prometheus_alertmanager_storage_type: pvc
    openshift_prometheus_namespace: openshift-metrics
    openshift_prometheus_node_selector: {“region”:”infra”}
    openshift_prometheus_pvc_size: 20Gi
    openshift_prometheus_state: present
    openshift_prometheus_storage_class: ceph-storage
    openshift_prometheus_storage_type: pvc


    We could also deploy some Grafana, that could include a pre-configured dashboard, rendering some Prometheus metrics – thanks to the playbooks/openshift-grafana/config.yml playbook and the following Ansible variables:

    Grafana

    OpenShift Dashboard on Grafana

    openshift_grafana_datasource_name: prometheus
    openshift_grafana_graph_granularity: 2m
    openshift_grafana_namespace: openshift-grafana
    openshift_grafana_node_exporter: True
    openshift_grafana_node_selector: {“region”:”infra”}
    openshift_grafana_prometheus_namespace: openshift-metrics
    openshift_grafana_prometheus_serviceaccount: prometheus
    openshift_grafana_storage_class: ceph-storage
    openshift_grafana_storage_type: pvc
    openshift_grafana_storage_volume_size: 15Gi


    And finally, we could also deploy logs centralization with the playbooks/openshift-logging/config.yml playbook, setting the following:

    Kibana

    Kibana integration with EFK

    openshift_logging_install_logging: True
    openshift_logging_curator_default_days: ‘7’
    openshift_logging_curator_cpu_request: 100m
    openshift_logging_curator_memory_limit: 256Mi
    openshift_logging_curator_nodeselector: {“region”:”infra”}
    openshift_logging_elasticsearch_storage_type: pvc
    openshift_logging_es_cluster_size: ‘1’
    openshift_logging_es_cpu_request: ‘1’
    openshift_logging_es_memory_limit: 8Gi
    openshift_logging_es_pvc_storage_class_name: ceph-storage
    openshift_logging_es_pvc_dynamic: True
    openshift_logging_es_pvc_size: 25Gi
    openshift_logging_es_recover_after_time: 10m
    openshift_logging_es_nodeslector: {“region”:”infra”}
    openshift_logging_es_number_of_shards: ‘1’
    openshift_logging_es_number_of_replicas: ‘0’
    openshift_logging_fluentd_buffer_queue_limit: 1024
    openshift_logging_fluentd_buffer_size_limit: 1m
    openshift_logging_fluentd_cpu_request: 100m
    openshift_logging_fluentd_file_buffer_limit: 256Mi
    openshift_logging_fluentd_memory_limit: 512Mi
    openshift_logging_fluentd_nodeselector: {“region”:”infra”}
    openshift_logging_fluentd_replica_count: 2
    openshift_logging_kibana_cpu_request: 600m
    openshift_logging_kibana_hostname: kibana.router.intra.unetresgrossebite.com
    openshift_logging_kibana_memory_limit: 736Mi
    openshift_logging_kibana_proxy_cpu_request: 200m
    openshift_logging_kibana_proxy_memory_limit: 256Mi
    openshift_logging_kibana_replica_count: 2
    openshift_logging_kibana_nodeselector: {“region”:”infra”}


    Meanwhile we could note that cri-o is getting better support in the latter versions of OpenShift, among a never-ending list of ongoing works and upcoming features.

    OpenShift

    As of late 2017, I got introduced to OpenShift. Even though I’ve only been playing with a few basic features, nesting Docker into static KVMs,  I was pretty impressed by the simplicity of services deployment, as served to end-users.

    After replacing 4x MicroServer, by 3x SE318m1

    After replacing 4x MicroServer, by 3x SE318m1

    I’ve first tried setting my own, re-using my ProLian MicroServers. One of my master node was refusing to deploy, CPU usage averaging around 100%, systemctl consistently timing out while starting some process – that did start on my two other master nodes.
    After trying to resize my KVMs in vain, I eventually went another way: shut down a stair of ProLian MicroServer, move them out of my rack and plug instead 3 servers I ordered a couple years ago, that never reached prod – due to doubts regarding overall power consumption, EDF being able to deliver enough Amperes, my switches not being able to provide with enough LACP channels, my not having enough SSDs or quad-port Ethernet cards in stock to fill these servers,  …

    I eventually compromised, and harvested any 500G SSDs disks available out of my Ceph cluster, mounting one per 1U server.

    Final setup involves the following physical servers:

    • a custom tower (core i5, 32G DDR, 128G SSD disk)
    • 3x HP SE316M1 (2xE5520, 24G DDR) – 500G SSD
    • 2x HP SE1102 (2xE5420 12G DDR) – 500G SSD
    • 3x ProLian MicroServer G5 (Turion, 4-8G DDR) – 64G SSD + 3×3-4T HDD

    And on top of these, a set of KVM instances, including:

    • 3 master nodes (2 CPU, 8G RAM)
    • 3 infra nodes (2 CPU, 6G RAM)
    • 3 compute nodes (4 CPU, 10G RAM @SE316M1)
    • 3 storage nodes (1 CPU, 3G RAM @MicroServer)

    Everything running on CentOS7. Except for some Ansible DomU I would use deploying OpenShift, running Debian Stretch.


    OpenShift can be deployed using Ansible. And as I’ve been writing my own roles for the past couple years, I can testify these ones are amazing.

    GlusterFS @OpenShift

    GlusterFS @OpenShift

    First ansible run would be done setting the following variables, bootstrapping service on top of my existing domain name, and LDAP server.

    ansible_ssh_user: root
    openshift_deployment_type: origin
    openshift_disable_check: disk_availability,docker_storage,memory_availability
    openshift_master_cluster_method: native
    openshift_master_cluster_hostname: openshift.intra.unetresgrossebite.com
    openshift_master_cluster_public_hostname: openshift.intra.unetresgrossebite.com
    openshift_master_default_subdomain: router.intra.unetresgrossebite.com
    openshift.common.dns_domain: openshift.intra.unetresgrossebite.com
    openshift_clock_enabled: True
    openshift_node_kubelet_args: {‘pods-per-core’: [’10’], ‘max-pods’: [‘250’], ‘image-gc-high-threshold’: [’90’], ‘image-gc-low-threshold’: [’80’]}
    openshift_master_identity_providers:
    – name: UneTresGrosseBite
      challenge: ‘true’
      login: ‘true’
      kind: LDAPPasswordIdentityProvider
      attributes:
        id: [‘dn’]
        email: [‘mail’]
        name: [‘sn’]
        preferredUsername: [‘uid’]
      bindDN: cn=openshift,ou=services,dc=unetresgrossebite,dc=com
      bindPassword: secret
      ca: ldap-chain.crt
      insecure: ‘false’
      url: ‘ldaps://netserv.vms.intra.unetresgrossebite.com/ou=users,dc=unetresgrossebite,dc=com?uid?sub?(&(objectClass=inetOrgPerson)(!(pwdAccountLockedTime=*)))’
    openshift_master_ldap_ca_file: /root/ldap-chain.crt

    Setting up glusterfs, note you may have difficulties setting gluster block devices as group vars, and could find a solution sticking to defining these directly into your inventory file:

    [glusterfs]
    gluster1.friends.intra.unetresgrossebite.com glusterfs_ip=10.42.253.100 glusterfs_devices='[ “/dev/vdb”, “/dev/vdc”, “/dev/vdd” ]’
    gluster2.friends.intra.unetresgrossebite.com glusterfs_ip=10.42.253.101 glusterfs_devices='[ “/dev/vdb”, “/dev/vdc”, “/dev/vdd” ]’
    gluster3.friends.intra.unetresgrossebite.com glusterfs_ip=10.42.253.102 glusterfs_devices='[ “/dev/vdb”, “/dev/vdc”, “/dev/vdd” ]’

    Apply the main playbook with:

    ansible-playbook playbooks/byo/config.yml -i ./hosts

    Have a break: with 4 CPUs & 8G RAM on my ansible host, applying a single variable change (pretty much everything was installed beforehand), I would still need over an hour and a half applying the full playbook: whenever possible, stick to whatever service-specific playbook you may find, …

    Jenkins @OpenShift

    Jenkins @OpenShift

    As a sidenote, be careful to properly set your domain name before deploying glusterfs. So far, while I was able to update my domain name almost everywhere running Ansible playbooks back, GlusterFS’s hekiti route was the first I noticed not being renamed.
    Should you fuck up your setup, you can use oc project glusterfs then oc get pods to locate your running containers, use oc rsh <container> then rm -fr /var/lib/hekiti to purge stuff that may prevent further deployments, …
    Then oc delete project glusterfs, to purge almost everything else.
    You may also use running docker images | grep gluster and docker rmi <images>, … As well as making sure to wipe the first sectors of your gluster disks (for d in b c d; do dd if=/dev/zero of=/dev/vd$d bs=1M count=8; done). You may need to reboot your hosts (if a wipefs -a /dev/drive returns with an error). Finally, re-deploy a new GlusterFS cluster from scratch using Ansible.


    Once done with the main playbook, you should be able to log into your OpenShift dashboard. Test it by deploying Jenkins.

    hawkular @OpenShift

    Hawkular integration @OpenShift


    You could (should) also look into deploying OpenShift cluster metrics collection, based on Hawkular & Heapster.
    Sticking with volatile storage, you would need adding the following variable to all your hosts:


    openshift_metrics_install_metrics: True

    Note to deploy these roles, you would have to install on your Ansible host (manually!) python-passlib, apache2-utils and openjdk-8-jdk-headless (assuming Debian/Ubuntu). You may then deploy metrics using the playbooks/byo/openshift-cluster/openshift-metrics.yml playbook.

    Hawkular integration would allow you to track resources usage directly from OpenShift dashboard.

    Prometheus @OpenShift

    Prometheus @OpenShift

    You could also setup Prometheus defining the following:

    openshift_prometheus_namespace: openshift-metrics
    openshift_prometheus_node_selector: {“region”:”infra”}

    And applying the playbooks/byo/openshift-cluster/openshift-prometheus.yml playbook.


    You should also be able to setup some kind of centralized logging based on ElasticSearch, Kibana & Fluentd, using the following:

    openshift_logging_install_logging: True
    openshift_logging_kibana_hostname: kibana.router.intra.unetresgrossebite.com
    openshift_logging_es_memory_limit: 4Gi
    openshift_logging_storage_kind: dynamic
    openshift_cloudprovider_kind: glusterfs

    Although so far, I wasn’t able to get it running properly ElasticSearch health is stuck to yellow, while Kibana and Fluentd can’t reach it somehow, could be due to a missing DNS record.


    From there, you would find plenty solutions, packaged for OpenShift, ready to deploy (a popular one seems to be Go Git Server).
    Deploying new services can still be a little painful, although there’s no denying OpenShift offers with a potentially amazing SAAS toolbox.