Menu

Yearly archives "2021"

4 Articles

Ceph Crash Recovery

Today we will see the steps to replace a Ceph node, including the MON, MGR, MDS and OSD services.

While I would usually try to salvage the disks from a failing node, sometimes using dd conv=noerror,sync iflag=fullblock dumping a filesystem from a disk ignoring IO errors, others using a disk duplication devices: today I am unable to salvage my node filesystem, we would see the steps to re-deploy a new host from scratch.


Redeploy Hypervisor

Starting from new drives, I reinstalled my physical server, using a local PXE. Using puppet, the server is then configured as a KVM hypervisor, and automount gives me access to my KVM models. I would next deploy a CentOS 8 guest, re-using the FQDN and IP address from my previous Ceph node.


Ceph MON

I would start by installing EPEL and Ceph repositories – matching my Ceph release, Octopus. Update the system, as my CentOS KVM template dates back from 8.1. Reboot. Then, we would install Ceph packages:

dnf install -y ceph-osd python3-ceph-common ceph-mon ceph-mgr ceph-mds ceph-base python3-cephfs

For simplicity, we would disable SELinux and firewalling – matching my other nodes configuration, though this may not be recommended in general. Next, we would retrieve Ceph configuration out of a surviving MON node:

scp -rp mon1:/etc/ceph /etc/

Confirm that we can now query the cluster, and fetch the Ceph mon. keyring:

ceph osd tree
ceph auth get mon. -o /tmp/keyring
ceph mon getmap -o /tmp/monmap

Having those, you may now re-create your MON, re-using its previous ID (in my case, mon3)

mkdir /var/lib/ceph/mon/ceph-mon3
ceph-mon -i mon3 –mkfs –monmap /tmp/monmap –keyring /tmp/keyring
chown -R ceph:ceph /var/lib/ceph/mon/ceph-mon3

Next, re-create the systemd unit starting Ceph MON daemon:

mkdir /etc/systemd/system/ceph-mon.target.wants/
cd /etc/systemd/system/ceph-mon.target.wants/
ln -sf /usr/lib/systemd/system/ceph-mon\@.service ceph-mon\@mon3.service
systemctl daemon-reload
systemctl start ceph-mon@mon3.service
journalctl -u ceph-mon@mon3.service
ceph -s

At that stage, we should be able to see the third monitor re-joined our cluster.


Ceph OSDs

The next step would be to re-deploy our OSDs. Note that, at that stage, we should be able to re-import our existing OSD devices, assuming they were not affected by the outage. Here, I would also proceed with fresh drives (logical volumes on my hypervisor).

Let’s fetch the osd bootstrap key (could be done with ceph auth get, as for the mon. key above) and prepare the directories for my OSDs (IDs 1 and 7)

scp -p mon1:/var/lib/ceph/bootstrap-osd/ceph.keyring /var/lib/ceph/bootstrap-osd/
mkdir -p /var/lib/ceph/osd/ceph-1 /var/lib/ceph/osd/ceph-7
chown -R ceph:ceph /var/lib/ceph/bootstrap-osd /var/lib/ceph/osd

Next, I would re-create my first OSD:

ceph osd out osd.7
ceph osd destroy 7
ceph osd destroy 7 –yes-i-really-mean-it
ceph-volume lvm zap /dev/vdb
ceph-volume lvm prepare –osd-id 7 –data /dev/vdb
ceph-volume lvm activate –all
ceph osd tree
ceph -s

We should be able to confirm the OSD 7 is back up, and that Ceph is now re-balancing data. Let’s finish with the second OSD I need to recover, following the same process:

ceph osd out osd.1
ceph osd destroy 1
ceph osd destroy 1 –yes-i-really-mean-it
ceph-volume lvm zap /dev/vdc
ceph-volume lvm prepare –osd-id 1 –data /dev/vdc
ceph-volume lvm activate –all
ceph osd tree
ceph -s

At that stage, the most critical part is done. Considering I am running on commodity hardware, VMs on old HP Micro Servers with barely 6G RAM and a couple CPUs, I’ve left Ceph alone for something like 12 hours, to avoid wasting resources with MDS and MGR daemons that are not strictly mandatory.


Ceph MGR

My data being pretty much all re-balanced, no more degraded or undersized PGs, I eventually redeployed the MGR service:

mkdir /var/lib/ceph/mgr/ceph-mon3
ceph auth get mgr.mon3 -o /var/lib/ceph/mgr/ceph-mon3/keyring
chown -R ceph:ceph /var/lib/ceph/mgr
mkdir ceph-mgr.target.wants
cd ceph-mgr.target.wants
ln -sf /usr/lib/systemd/system/ceph-mgr\@.service ceph-mgr\@mon3.service
systemctl daemon-reload
systemctl start ceph-mgr@mon3
ceph -s


Ceph MDS

Next, as I’m using CephFS with my Kubernetes clusters, I would need to recreate my third MDS. The process is pretty similar to that of deploying a MGR:

mkdir /var/lib/ceph/mds/ceph-mon3
ceph auth get mds.mon3 -o /var/lib/ceph/mds/ceph-mon3/keyring
chown -R ceph:ceph /var/lib/ceph/mds
mkdir ceph-mds.target.wants
cd ceph-mds.target.wants
ln -sf /usr/lib/systemd/system/ceph-mds\@.service ceph-mds\@mon3.service
systemctl daemon-reload
systemctl start ceph-mds@mon3
ceph -s


Finishing up

In my case, I’ve also installed and configured NRPE probes.
Note that I did not cover the topic of re-deploying RadosGW: in my case, with limited resources on my Ceph nodes, my RGW daemons are deployed as containers, in Kubernetes. My workloads that require s3 storage may then use Kubernetes local Services and Secrets with pre-provisioned radosgw user credentials.

Obviously I could have used ceph-ansible redeploying my node. Though there’s more fun in knowing how it works behind the curtain. I would mostly use ceph-ansible deploying clusters, with customers — mine was last deployed a couple years ago.

The time going from an installed CentOS to a fully recovered Ceph node is pretty amazing. No more than one hour re-creating Ceph daemons, a little over 12h watching objects being recovered and re-balanced — for over 2Tb of data / 5T raw, and again: old and low quality hardware, when compared with what we would deal with IRL.

From its first stable release, in early 2010s, to the product we have today, Ceph is a undeniably a success story in the Open Sources ecosytem. Haven’t seen a corruption I couldn’t easily fix in years, low maintenance cost, still runs fairly well on commodity hardware. And all that despite of RedHat usual fuckery.

Mesos

Today we would take a short break from Kubernetes, and try out another container orchestration solution: Mesos.

Mesos is based on a research project, first presented in 2009 under the name of Nexus. Its version 1 was announced in 2016 by the Apache Software Foundation. In April 2021, a vote concluded Mesos should be moved to the Apache Attic, suggesting it reached end of life, though that vote was later cancelled, due to increased interest.


A Mesos cluster is based on at least three components: a Zookeeper server (or cluster), a set of Mesos Master and the Mesos Slave agent, that would run on all nodes in our cluster. Which could be compared to Kubernetes etcd, control plane and kubelet respectively.

Setting it up, we would install Mesos Repository (on CentOS7: http://repos.mesosphere.io/el/7/noarch/RPMS/mesosphere-el-repo-7-1.noarch.rpm), then install the mesos package on all nodes, as well as mesosphere-zookeeper on the Zookeeper nodes.

Make sure /etc/mesos/zk points to your Zookeeper node(s).

Open ports 2181/tcp on your Zookeeper nodes, port 5050/tcp on master nodes, and 5051/tcp on agents.

Start zookeeper, mesos-master and mesos-slave services.

We should be able to connect our Master console, on port 5050, and confirm our agents have properly registered.Mesos Agents


With Mesos, we are likely to first deploy some frameworks, that would then orchestrate our applications deployment.

Frameworks would take care of scheduling workloads on your behalf, using Mesos resources. The first one we should look into is Marathon, which could be compared to Kubernetes Deployment and StatefulSets controller, in that it would ensure an application is “always on”.

We may deploy Marathon on a separate node, or to an existing Mesos instance, installing the marathon package from the same repository we installed Mesos from. Note that CentOS7 default JRE seems to be an issue running Marathon latest releases: you may want to install marathon-1.4 instead.

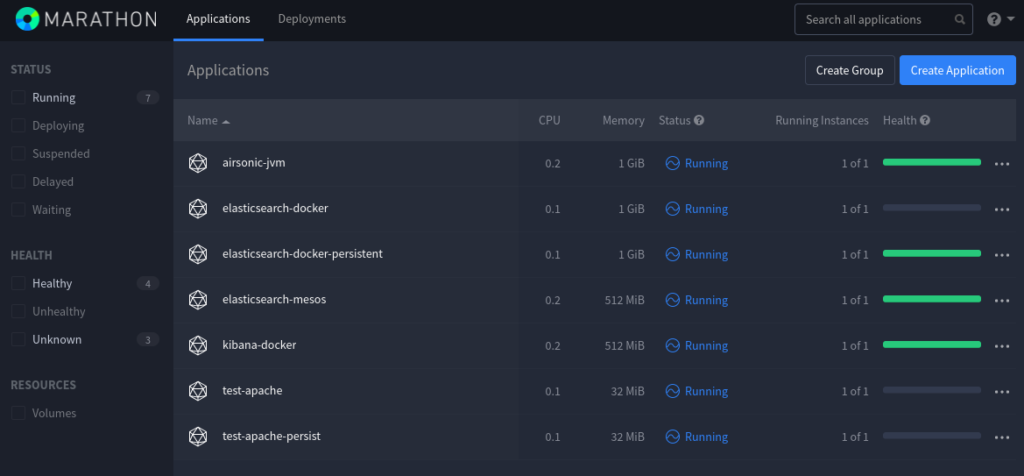
Marathon listens on port 8080/tcp, which should be opened as well. Having done so, we may connect the Marathon UI to deploy our applications – or POST json objects to its API.

Marathon

Now, we could look into what makes Mesos interesting, when compared with Kubernetes.

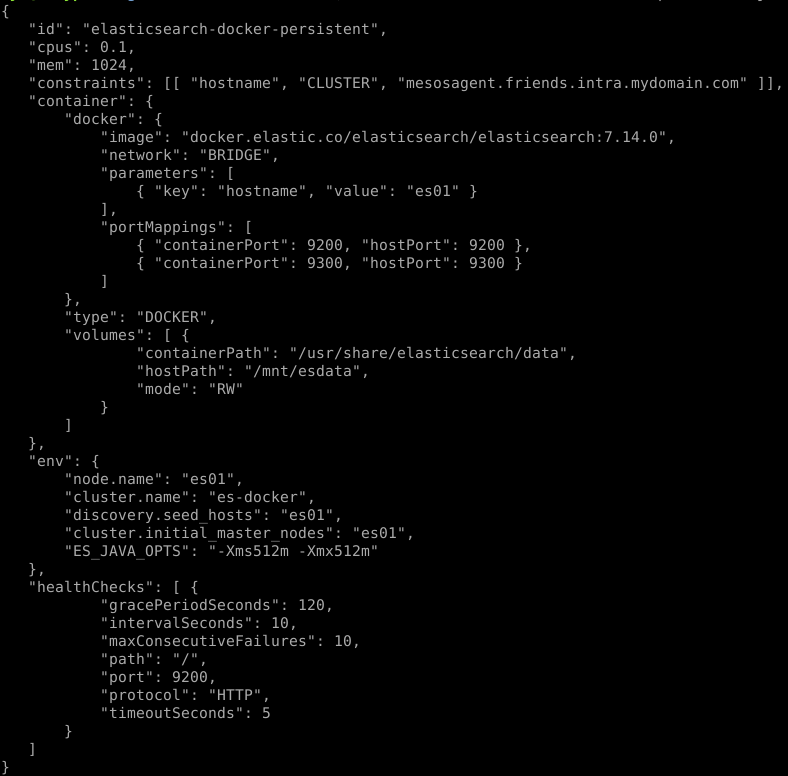
You may know Mesos can be used deploying Docker container, which would be done posting something like the following, to the Marathon API:

Though the above relies on the Docker runtime, which is not mandatory, using Mesos.

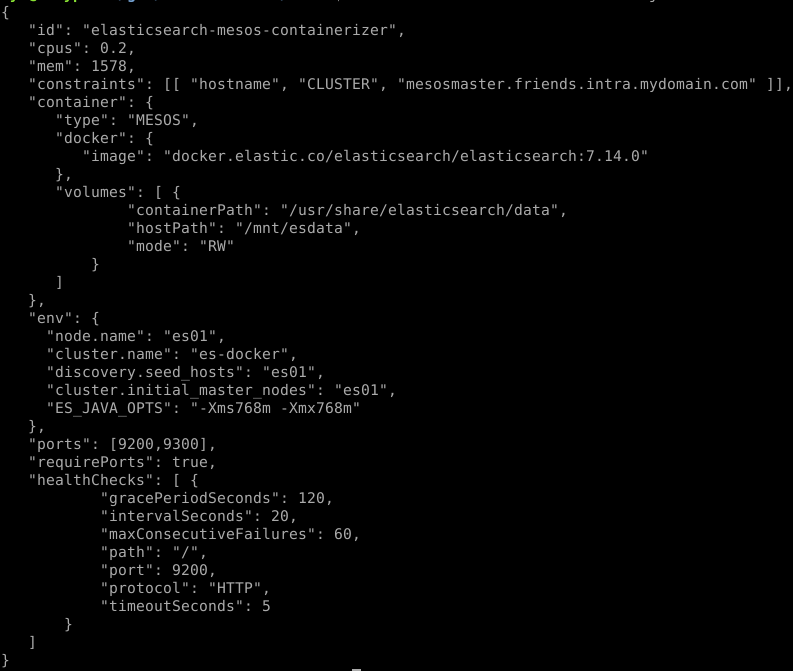
Indeed, we could describe the same deployment, with the following:

Mesos comes with its own containerizer, able to start applications from OCI images.

We could also note that Mesos may be used managing services, based on binary or whatever asset we may pull out of an HTTP repository – or already present, on our nodes filesystem. To demonstrate this, we could start some Airsonic application, posting the following to Marathon:

Going further, we should look into other frameworks, such as Chronos – somewhat comparable to Kubernetes Jobs controller.

PID / IPC / network / filesystem / … isolations may be implemented using isolators. Though a lot of features we would usually find in Kubernetes would here be optional.

Nevertheless, deployments are pretty fast considering the few resources I could allocate that lab. With the vast majority of container orchestration solutions being based on the same projects nowadays, it’s nice to see a contestant with its own original take. Even though Mesos probably suffers from limited interest and contributions, when compared with Kubernetes.

Kubernetes Cluster Upgrade with Kubespray

Last year, I did deploy a Kubernetes cluster using Kubepsray – after giving a try to OpenShift 4.

I did deploy a 1.18.3, which is reaching EOL, and am now looking into upgrading it.
The Kubespray documentation is pretty straight forward: iterate over their releases, one after the other, re-applying the upgrade playbook, and eventually
forcing the Kubernetes version.

$ cd /path/to/kubespray
$ git status
On branch master
[...]
$ git pull
[...]
$ git tag
[...]
v2.13.2
v2.13.3
v2.13.4
v2.14.0
v2.14.1
v2.14.2
v2.15.0
v2.15.1
[...]

My first issue being that I did not use a Kubepsray release to deploy my cluster: I just cloned their repository and went with their last master – worked perfectly fine, which is a testament to the stability of their code.

Looking at existing tags in their repository, I tried to figure out was the closest to the one I’ve been using deploying that cluster. My Kubernetes version 1.18.3 being somewhere in between Kubespray v1.13 and v1.14.0.

$ git diff 6bc60e021e39b049ec7135bd4cfb4adfce44d1f7..v2.13.3
[...]
$ git diff 6bc60e021e39b049ec7135bd4cfb4adfce44d1f7..v2.13.4
[...]
$ git diff 6bc60e021e39b049ec7135bd4cfb4adfce44d1f7..v2.14.0
[...]
$ git diff 6bc60e021e39b049ec7135bd4cfb4adfce44d1f7..v2.14.1
[...]

I decided to start from v1.14.0. Their default Kubernetes version being 1.18.8.

Kubepsray upgrades should be applied one after the other.
According to their doc, one shouldn’t skip any tag – though checking their diffs, it looks like we may skip patch releases.

First, we would check the changes in Kubepsray sample inventory, figuring out which variables needs to be added, removed or changed, from our cluster inventory:

$ git diff 6bc60e021e39b049ec7135bd4cfb4adfce44d1f7..v2.14.0 inventory/sample
[...]
$ vi inventory/mycluster/group_vars/all/all.yaml
$ vi inventory/mycluster/group_vars/k8s-cluster/addons.yaml
$ vi inventory/mycluster/group_vars/k8s-cluster/k8s-cluster.yaml

Chosing the target Kubernetes version, make sure that it is handled by Kubespray.
Check for the kubelet_checksums and crictl_versions arrays in roles/downloads/defaults/main.yaml.
When in doubt, stick with the one configured in their sample inventory.

Once our inventory is ready, we could take some time to make sure our cluster is in an healthy state.
If there’s any deployment that can be shut down, replicas count that can be lowered, … any workload that can be temporarily removed would speed up your upgrade time.
We could also check disk usages, clean it all up, there’s no troubles updating repositories, pulling images, …
In my case, I would also check my Ceph cluster, serving persistent volumes for Kubernetes, ensure that all services are up, that there’s no risk some volume could be stuck at some point, waiting for an I/O or something, …

Eventually, we may start applying our upgrade:

$ ansible-playbook -i ./inventory/mycluster/hosts.yaml ./upgrade-cluster.yml \
    | tee -a upgrade-$(date +%s)-from-1.18.3-to-1.18.8.log

We would see Kubepsray would start checking cluster variables, eventually pre-pulling and caching assets and container images on our nodes.
Once those checks are done, it would start by upgrading the etcd cluster – all at once, though this is done pretty quickly, the Kubernetes API did not seem to suffer from it.

Next, it would upgrade Kubernetes API services on the first master node. Setting it unschedulable if it was not already, draining it, upgrading Kubelet, the container runtime, making sure proper kernel modules are loaded, … Starting the new API, scheduler and controler Pods.
After upgrading the first master, parts of Kubepsray apps are redeployed, installing the last CSI & RBAC configurations. Then, the other masters are upgraded, one after the other.

Once all masters are up-to-date, Kubespray would upgrade the cluster SDN – in my case, Calico.
This goes pretty fast, the playbook applies changes on two nodes at once, I didn’t have much time to check for side effects – all in all, I didn’t see my apps suffer at that stage.

We’re now done with the most critical parts, and left with those that will affect availability for our hosted applications.

Kubespray would then go, one node after the other: cordon, drain, update runtime, restart services, uncordon.
The draining part can take a long time, depending on your nodes sizes and overall usage.

Every 10.0s: kubectl get nodes
NAME       STATUS                     ROLES    AGE    VERSION
compute1   Ready                      worker   314d   v1.18.8
compute2   Ready                      worker   314d   v1.18.8
compute3   Ready                      worker   314d   v1.18.8
compute4   Ready                      worker   314d   v1.18.8
infra1     Ready                      infra    314d   v1.18.9
infra2     Ready                      infra    314d   v1.18.9
infra3     Ready,SchedulingDisabled   infra    314d   v1.18.8
master1    Ready                      master   314d   v1.18.9
master2    Ready                      master   139d   v1.18.9
master3    Ready                      master   314d   v1.18.9

We could see failures – I did have the upgrade playbook crash once, due to one node drain step timing out, which led me to find a PodDisruptionBudget, preventing one Pod from being re-scheduled (KubeVirt). In such case, we may fix the issue, then re-apply the upgrade playbook – which would be a bit faster, though would still go through all steps that already completed.
To avoid these, I then connected on each node during its drain phase, made sure there were no Pod stuck in a Terminating state, or others left Running while the drain operation should be shutting them down.
Also note that re-applying the upgrade playbook, we could speed things up on nodes that were already processed by setting them unschedulable – in which case, the drain is skipped, container runtime and kubelet would still be restarted, with little to no effect on those workloads.

Once all nodes would be up-to-date, Kubespray would go through its Apps once again, applying the last metrics server, ingress controller, registry, depending on which ones you’ve enabled – in my case, I disabled most of those from my inventory prior upgrading, to skip those steps.

In about three hours, I was done with my first upgrade (10x 16G nodes cluster, overloaded). I could start over, from the next tag:

$ git checkout v2.14.1
$ git diff v2.14.0..v2.14.1 inventory/sample
$ vi inventory/mycluster/xxx
$ ansible-playbook -i ./inventory/mycluster/hosts.yaml ./upgrade-cluster.yml \
    | tee -a upgrade-$(date +%s)-from-1.18.8-to-1.18.9.log

This one went faster, a little under 2 hours. No error.
And the next ones:

$ git checkout v2.14.2
$ git diff v2.14.1..v2.14.2 inventory/sample
$ vi inventory/mycluster/xxx
$ ansible-playbook -i ./inventory/mycluster/hosts.yaml ./upgrade-cluster.yml \
    | tee -a upgrade-$(date +%s)-from-1.18.9-to-1.18.10.log
$ git checkout v2.15.0
$ git diff v2.14.2..v2.15.0 inventory/sample
$ vi inventory/mycluster/xxx
$ ansible-playbook -i ./inventory/mycluster/hosts.yaml ./upgrade-cluster.yml \
     | tee -a upgrade-$(date +%s)-from-1.18.10-to-1.19.7.log
$ git checkout v2.15.1
$ git diff v2.15.0..v2.15.1 inventory/sample
$ vi inventory/mycluster/xxx
$ ansible-playbook -i ./inventory/mycluster/hosts.yaml ./upgrade-cluster.yml \
     | tee -a upgrade-$(date +%s)-from-1.19.7-to-1.19.9.log

Having reached the last Kubespray release, we may finish with upgrading and rebooting our nodes. One after the other:

$ kubectl cordon node1
$ kubectl drain --delete-emptydir-data --ignore-daemonsets node1
$ ssh root@node1
# apt-get upgrade
# apt-get dist-upgrade
# reboot
$ kubectl uncordon node1

In my case, having disabled most Kubespray applications, I would also make sure the last Ingress Controller, Registry, RBD & CephFS Provisioner are up to date

$ vi roles/downloads/defaults/main.yaml
$ find roles/kubernetes-apps/ingress_controller/ingress_nginx/ -name '*.j2'
$ vi roles/kubernetes-apps/ingress_controller/ingress_nginx/templates/ds-ingress-nginx-controller.yml.j2
$ kubectl edit -n ingress-nginx ds/ingress-nginx
[...]

In the end, upgrading that cluster from 1.18.3 to 1.19.9 took me about 10 hours. Though I suspect I could have went straight to 1.19.9, and Kubespray v2.15.1. Being my first time with those playbooks, I would rather take my time and repeat until I’m confident enough with it.
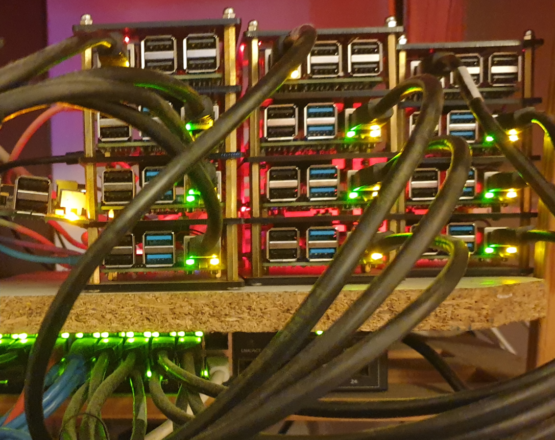
And while it was not on my mind in the first place, I also took a couple hours to upgrade an other cluster of mine, 11 Raspberry Pi nodes I deployed in January, from 1.19.3 to 1.19.9.

Having played with Kubepsray for about a year, I was pretty confident following their docs and releases wouldn’t be an issue. Still, it’s a relief having gone through those upgrades.
Otherwise working with OpenShift 4, it’s kind of amazing to see a Kubernetes cluster upgrading without all the outages you would see with OpenShift: etcd operator and cluster upgrading, the Kubernetes API, the OpenShift API, the SDN, CSI, the OAuth operator, … nodes drain and reboot.
Kubespray upgrades are way smoother, you decide when to upgrade applications and operators. OpenShift 3 and openshift-ansible simplicity, without its unreliability.

Kubernetes & Ceph on Raspberry Pi

Having recently deployed yet-another Kubernetes cluster using Kubespray, experimenting with a Raspberry Pi lab, I’ve been looking with some issue I was last having, with Raspbian.

The issue being that Raspbian does not ship with the rbd kernel module, which is usually necessary attaching rbd devices out of a Ceph cluster.
One way to get around this would obviously be to rebuild the kernel, though I’m usually reluctant to do so.

Digging further, it appears that as an alternative to the rbd kernel module, we may use the nbd one, which does ship with Raspbian.


Here is how we may proceed:


# apt-get install ceph-common rbd-nbd
# scp -p root@mon1:/etc/ceph/ceph.conf /etc/ceph
# scp -p root@mon1:/etc/ceph/ceph.client.admin.keyring /etc/ceph
# rbd -p kube ls
# rbd-nbd map kube/kubernetes-dynamic-pvc-d213345c-c5e8-11ea-ab48-ae4bf5a40627
# mount /dev/nbd0 /mnt
[...]
# mount /mnt
# rbd-nbd unmap /dev/nbd0


Now, that’s a first step. The next one would to to get this working with Kubernetes.
Lately, the CSI (Container Storage Interface) is being promoted up to a point that the Kubernetes scheduler image no longer ships with Ceph binaries: a controller will be dealing devices provisioning, while another one would be attaching and releasing Ceph block devices on behalf of our nodes.

Fortunately, while it is not official yet, all of the container images required can be found, searching on GitHub and DockerHub.
I did publish a copy of the configuration files required setting up Ceph rbd provisioning and devices mapping on Kubernetes. Although it is mandatory for your nodes to run some arm64 versions of the Raspbian image, which is currently in beta, though has been working pretty well as far as I could see.


This is yet another victory for Kubernetes, against products such as OpenShift: Lightweight, modular, portable, easy to deploy, … Efficient.